You have a Smart Home using Z-Wave as a wireless technology for all these Internet of Things (IoT) devices to communicate with each other. But maybe things are not working quite as well as you expect. You press a button on your phone and 1… 2… 3… and then finally a light comes on or maybe it doesn’t come on at all! Another common problem is when a battery powered sensor was updating the temperature last week and this week it just doesn’t seem to be sending updates anymore or at best sporadically. As a Z-Wave expert I’ve built and rebuilt hundreds of Z-Wave networks and have come up with a few habits to make Z-Wave networks more reliable.
1. Minimize Polling
This is probably THE number one mistake new users of Z-Wave make. They figure Z-Wave is a high speed network so they can just poll a light switch every 3 seconds and then react to any change in the switch. Z-Wave and most other wireless networks work best when the network is highly available. If the network is busy, every device that needs to send a message has to wait its turn and then compete (and often collide) with all that polling traffic. Collisions slow everything down just like rubber-necking on the highway.
Polling used to be the only way to get around a patent that fortunately expired in February 2016. The patent forced many light switch manufacturers to not send a message when you flipped the switch. Several manufacturers found ways to get around this or they licensed the patent. But now that the patent has expired, you can get light switches that do send a report immediately when their state has changed.
So the primary way to minimize polling is to replace the few devices in your Smart Home that trigger an event (or SmartApp or Magic or whatever your hub calls it) with one that will instantly send an update. If you have some older switches but they’re not that important to instantly know their state has changed, you can still poll them but no more than once every few minutes. Remember that if you have 60 Z-Wave devices and you poll each one once/min then you are polling once/second and the network is hammered! So only poll a couple of nodes!
2. Have enough devices to create a mesh
I can’t tell you how many people I’ve worked with that had a door lock and a hub and nothing else, maybe a battery powered thermostat. And they wondered why the connection to the lock was unreliable when the hub was at the far end of the building! Z-Wave relies on Always-On (110VAC powered) nodes to build a “mesh” network. The mesh is the key to Z-Wave reliability. Every Always-On node acts as a repeater in the mesh and is able to forward a message from one node to another in the mesh. But only the Always-On nodes can forward a message. Battery powered devices like door locks and battery powered thermostats cannot forward messages. Only the Always-On nodes can.
Solution: If some devices are not reliable, add more Always-On devices. Add a Z-Wave repeater or any device like a lamp dimmer. Even if you don’t use the lamp dimmer it will act as a repeater and improve the network. I have a few lamp switches I use for my Christmas lights which I leave plugged in year round because they help the Z-Wave network since these nodes are at the periphery of my home.
Distance between nodes is not always the criteria for adding more nodes in a network. The Z-Wave radio signals may bounce off metal objects like mirrors or appliances and cause two nodes that are only a few feet apart be completely unable to talk to each other due to reflections of the radio signals. Adding more nodes in the mesh provide alternate routes to nodes that otherwise might be in a dead zone due to these reflections cancelling out the radio signals.
3. Place the hub in a central location
Putting the hub in a corner of the basement might be convenient, but its a terrible idea for Z-Wave. The hub is the most important node in the network and should have the best location possible. While Z-Wave is a mesh network and can route or hop thru other nodes in the mesh, each hop is a significant delay and chokes up the network with more traffic. Ideally the hub should reach 90% of the nodes in your Smart Home without relying on routing. If the hub has Wifi then putting it in a central location is easy, you just need a wall outlet to plug it in. I have my hub hung off the back of a TV cabinet in roughly the middle of the first floor of my home.
4. Heal the Network
Once a Z-Wave network is built, it has to be “healed” so every node can use all the other nodes in the network to route messages. This healing process can take many minutes to even hours depending on the size of the network. When you first build a Z-Wave network, the first node added only knows that the hub is in the network. When you add a second node, the hub knows that both the nodes are in the network but the first node you added has no idea that node 2 is there – unless you heal the network. So any time you add a node, you need to heal at least a few nodes in the network if not the entire network. Be cautious with the healing process – it uses 100% of the Z-Wave bandwidth during the process and every node will wake up every FliR node (door locks) at least once which will drain the batteries of the FLiR node. Generally only heal when nodes have been added or removed or if there seems to be a problem in the network.
Z-Wave is able to self-heal automatically. Z-Wave nodes will try various routes to get their message thru if at first it doesn’t succeed. The node will remember the Last Working Route and try that one first for the next message. But if the nodes have no idea there are other nodes in the network they have no way of knowing what routes to try so at least one full heal of the network is required.
HomeSeer
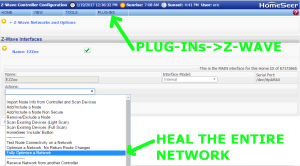 HomeSeer has several platforms so the precise method might be slightly different than shown here. From the web interface home page select the menu Plug-Ins->Z-Wave->Controller Management then select the Action “Fully Optimize a Network”. The network wide heal will take some time depending on the size of the network.
SmartThings
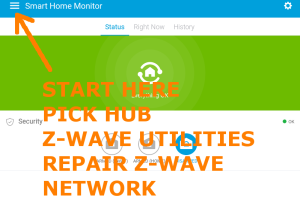 SmartThings user interface is thru their app which makes finding the network heal a bit of a challenge. Start from the dashboard and click on the three lines in the upper left corner. Your Hub should be the first choice in the menu that slides out, click on your hub. A new menu comes up, click on the last choice “Z-Wave Utilities”. The last choice on the next menu that slides in is “Repair Z-Wave Network” so click on it and then click on “Start Z-Wave Network Repair”. The repair will take from minutes to over an hour depending on the size of your network.
Vera
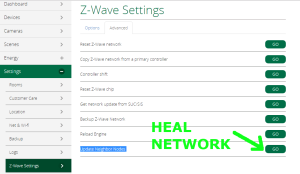 Vera has several versions of their UI but each of them has a similar menu structure so these instructions should work on any version. The Vera version shown here is UI7. Use a PC to log into GetVera.com and select your hub. From the Dashboard, select Settings->Z-Wave Settings and then click on the advanced tab. At the bottom of the advanced tab is the GO button to run the “Update Node Neighbors”. Depending on the size of the Z-Wave network this process will take several minutes to over an hour.
5. If a device doesn’t pair, first exclude it, then include it
You’ve taken the brand new Z-Wave IoT widget out of the box and you’ve tried to pair it (the Z-Wave term is “inclusion”) but it just won’t include! Arrrghhh! The first thing to try is to exclude the node first and then try including it. Any hub can “reset” or exclude a Z-Wave device even if that device was previously connected to another network. Some manufacturers occasionally fail to exclude the device during testing so the device may already be connected to their test network. ![]() Or you may have inadvertently included the device but the inclusion process failed somehow and the hub is confused. Excluding the node should reset it to the factory fresh state. Newer Z-Wave Plus devices (which have this logo on them) are required to have a way to reset them to factory defaults using just the device itself. Every device is different so you’ll have to refer to the device manual to perform a factory reset but if all else fails this should make the device ready to pair. Naturally having the hub physically close to the device being paired will also help though most devices can be paired from a distance.
Or you may have inadvertently included the device but the inclusion process failed somehow and the hub is confused. Excluding the node should reset it to the factory fresh state. Newer Z-Wave Plus devices (which have this logo on them) are required to have a way to reset them to factory defaults using just the device itself. Every device is different so you’ll have to refer to the device manual to perform a factory reset but if all else fails this should make the device ready to pair. Naturally having the hub physically close to the device being paired will also help though most devices can be paired from a distance.
Secure devices like door locks are particularly challenging to pair. First the secure device has to join the Z-Wave network, then the AES-128 encryption keys have to be exchanged and if that process fails (which it does on occasion), then you have to exclude and try the inclusion process all over again. Secure devices definitely want to be within a few feet of the hub during inclusion to ensure reliable and speedy Z-Wave communication.
6. Battery life and how to maximize it
When a battery powered Z-Wave device wakes up and turns on its radio, it uses 10,000 times more battery power than when it’s asleep. So the entire trick to making batteries last is to minimize the amount of time the device is awake. Some devices naturally have other battery draining activities mostly involving motors to throw a deadbolt or raise a window shade. Obviously any motor will use a lot more battery power than the Z-Wave radio but the radio will play a significant role in battery life.
When a battery powered device is added to a Z-Wave network the hub should do two things:
- Assign the Association Group 1 NodeID to the hub
- Association Group 1 is the “LifeLine” in Z-Wave and devices use this lifeline to send all sensor data and alerts to this node
- All hubs are required to assign Group 1 but double check this assignment
- Set the Wake Up Interval to no more than once per hour and ideally only a few times per day
- Every hub assigns the WakeUpInterval differently and largely handles it behind the scenes so this may be difficult to verify or change
- If the device is waking up every few minutes and sends a sensor reading then its battery life isn’t going to be more than a few weeks
- The battery level of the device is usually reported at the WakeUpInterval rate
Many sensors have other Association Groups or Configuration Parameters that will let you specify the frequency of sensor readings. Realize that the more often the sensors report in, the shorter the battery life.
7. Dead nodes in your controller
One of the big problems in Z-Wave network maintenance is eliminating “dead” nodes. When a device fails or for whatever reason is no longer in use, then it needs to be removed from the controller. If it remains in the controller then the controller will try to route thru this dead node on occasion resulting in delays in delivering messages. Eventually the self-healing aspects of Z-Wave will make this less likely but various devices will on occasion attempt to route thru it. Since the node is dead, that wastes valuable Z-Wave bandwidth and potentially battery power of sleeping devices. Occasionally running a Heal on the network will remove the node from the routing tables but it will remain in the controllers routing tables. It is best to completely remove this dead node. Each hub has a different method for removing dead nodes and usually requires going into an advanced Z-Wave menu.
Following these guidelines will help your Z-Wave experience be more robust. If you have more questions please feel feel to reach out via email to drzwave at expresscontrols.com.

Really informative article, thanks for writing it. Regarding habit 1, how can you tell if a dimmer switch is capable of triggering an event (rather than polling)? Could you make a few recommendations?
LikeLike
Generally most Z-Wave PLUS (the key is the PLUS) certified dimmers have “instant status” where they report their status automatically. Many new dimmers are also coming out with Central Scene Command Class which enables multiple taps of the switch to activate various scenes. For example, double tapping the top half of the switch can execute a special scene that dims the lights to watch TV whereas a single tap just turns that one light on.
The new Nortek WD500Z5 (not the older WD500Z – note the 5 on the end) and the Dragon Tech dimmers have central scene.
HomeSeer has a listing of a few dimmers but there are a lot of other ones on the market.
LikeLike
Will Z-Wave and Z-Wave Plus devices mesh together?
LikeLike
Yes! Z-Wave and Z-Wave Plus are 100% compatible with each other. The Radio Technology is identical. Z-Wave Plus adds a lot of checks during Z-Wave certification so you can buy with confidence that the quality of the product (at least as far as Z-Wave is concerned) is much higher.
I recommend buying primarily Z-Wave Plus devices.
LikeLike
Regarding Z-Wave heals, Vera has removed this function from it’s most recent UI7 firmware stating that this was due to a recent change at the protocol level (by Sigma) which means heals are no longer required. But I don’t understand this. What happens if I change the location of a device? How do I ensure routing is optimal if I can no longer run a network heal?
Thanks for a great article.
LikeLike
I’ve sent a request in to Vera to see if they have in fact removed “heal”. UI7 still has Settings->Z-Wave settings->Advanced and then the Update Neighbor Nodes which does appear to do a heal to at least some (but not all) nodes. I’v sent in a request to Vera for more details.
LikeLike
I heard back from Vera. They do still have Heal which is under the Settings menu as described above. What they have removed was their own routing algorithms. With a 500 series controller, they utilize the built-in routing algorithms from Sigma Designs. The main reason for using their own algorithms for the 300 series controllers (and earlier), was that the routing algorithm was potentially infinite. The controller would continue to try EVERY possible route which in a large network would take minutes. With the 500 series, the Last Working Route (LRW) is always tried and then up to 5 alternate routes are attempted. If those don’t work, then the frame is not delivered and dropped. This ensures that any frame will always timeout in about 10 seconds (a little longer when talking to FLiRS nodes).
With a 500 series controller, you also get Explorer frames so the network will automatically Heal itself to find a new LRW. But a full neighbor rediscovery is still better.
LikeLike
Will multiple Z-wave mesh’s piggyback off each other?
I have a single hub at the moment, my alarm panel that controls door locks/cameras/perimeter sensors/etc. But it’s pretty much locked down to a very small feature set and doesn’t play well when I put other devices on it (smart plugs/switches/lighting/etc). So I’m looking at getting another hub to control everything that isn’t security related, either a ST or a Pi with Hass.io and a Zwave/Zigbee stick.
If I went this route, would this require me to build another mesh with just the devices talking to the new ST/Hassio hub or would both mesh networks be able to bounce off each other to communicate with their respective nodes?
LikeLike
If you build two Z-Wave networks with the the security items related on one and the lights/thermostats/sensors on the other, then the two networks are separate and will not utilize each other for the mesh. Worse, you now have two networks that will interfere with each other.
You should be able to get all these devices on one Z-Wave network though. The security panel should be able to join another network or allow another hub to connect to it. Then you have 2 hubs on 1 network and it is up to you to manage who is in charge of which devices.
The best solution however is to get all the devices controlled via one hub – SmartThings, HomeSeer, Vera, Iris, Nexia, will all do what you are looking for. Homeseer has several plugins for certain security panels.
LikeLike
Yeah,that’s what I was afraid of, thanks for the quick reply. Security panel is from Vivint and from what I have been reading they don’t play well with secondary hubs/controllers but a few people have managed to get a ST hub working with it, will look further into HomeSeer and/or Hass.io as well. Thanks again!
LikeLike
Would you go into detail on z-wave vs z-wave plus, and how it relates to encryption such as “network”, AES S0, AES S2.
LikeLike
Sure – I’ve captured this for a future blog entry.
LikeLike
I am new to home automation and am exploring the possibility to use z-wave plus nodes for my home automation. Using the tools here, http://www.z-wave.com/shop-z-wave-smart-home-products/category/smart-hubs, I see that the hubs that have zwave plus along with zig bee and bt are either vera or samsung. Have you looked at these hubs to figure out if any personal data (location, IP, number of times locked, number of devices) gets sent to the manufactures or other 3rd party using their cloud infrastructure? Am i paranoid :)?
LikeLike
I believe that in general all the Hub vendors will protect your privacy as it would not look good for them if they didn’t. As you mentioned, the Cloud hubs in particular will have the current state of every device in your home recorded 24/7/365. Some system are less Cloud centric – HomeSeer for example runs completely locally and I know their servers don’t store anything. You still have access via your phone/internet but the Homeseer servers are just relaying IP addresses and I believe the data comes from your system to your screen with little if any going thru HomeSeer servers. Contrast that with Samsung where everything is in the cloud all the time so they know all see all. Vera is somewhere in the middle as they do much of the processing locally.
Ultimately if you want to use one of the Open Source systems then you can see where all of your data is and restrict it to some degree. But that takes a lot of work and a lot of expertise.
LikeLike
Do you have any advice on what to start with as far as hubs? I know I dont want to go smart things since it is cloud based and want flexibility for as many protocols as possible. If i do the home assistant or any open source, what would be needed to “talk” to devices (docs arent clear)? If I go hub which would be better use ?
Thank you,
LikeLike
There are many many choices for hubs and the list keeps getting longer! So far I have not been impressed with any of the Open Source offerings and so many have started out strong to quickly fizzle when it came time to make something more than a single light turn on/off. Right now I would recommend using HomeSeer. They by far have the best Z-Wave support. The Raspberry Pi based version is low power, cheap and runs completely local but you can still access via your phone/internet. Vera is also pretty good. As you mentioned SmartThings is cloud based but it is clear their intention is to have it in all of the Samsung TVs, phones and other devices (refrigerators maybe?). Fibaro and Zipato have been trying to make inroads in the US but doing well in Europe.
LikeLike
I’m an ex-Wink hub user. Have been using the Hassio/Home Assistant on a Pi/Aeotech stick as my primary controller for a couple months now and really liking it. As long as you are able/willing to do some small programming in JSON (bunch of support guides on their forum) then it’s a breeze and they have been keeping things updated nicely and completely non cloud based, but they have also been automating a lot of the processes with updates. Controls to lights/switches/locks/etc are super quick from the App.
If you need it to talk to Alexa/Google Home/Etc, then you need to have a cloud account with Nabu Casa who Hassio is using to handle the hand-off. Costs $5/mo but allows the communication.
LikeLike
I have had good luck using Home Assistant which can be used on a Rasberry Pi or Windows/MAC OS (I would recommend a VM). Definitely not for everyone as you will have to customize control layouts but you get the added benefit of controlling virtually all non z-wave smart home devices as well from one interface.
LikeLike
Ditto. Using the Pi/Aeotec stick for Hassio here. Was a little put off on the original setup of it originally but they have come a long way in building in a lot of the features (Automations/etc) with the latest updates so you don’t have to get fully into the JSON scripting which can throw a lot of people off. Really digging it so far.
LikeLike
How does one make the network “heal” as you put it? Does the Controller have to initiate?
LikeLike
Yes, the controller has to initiate the network heal. Unfortunately every Hub has a different User Interface method to initiate a full network heal. It is required to have network heal for certification but it may be hidden even to the point where the User Interface doesn’t have it and only Installers can get to it.
LikeLike