In this posting I’ll show how I made not just a Z-Wave packet sniffer but a SUPER Z-Wave packet sniffer that is able to receive many Z-Wave frames that a mere average sniffer cannot.
If you are a Z-Wave developer there is a packet sniffer tool available with the Z-Wave development kit called the “Zniffer” that is similar to the popular WireShark network sniffer. Unfortunately for the average Z-Wave user, the tool is only available to developers which requires the purchase of a DevKit and signing the applicable NDA documents. The Zniffer software is available on the Sigma Technical Support Site (ZTS) which requires an account approved by Sigma so you have to prove you are a developer. The Zniffer is invaluable for developing with Z-Wave because it decodes and can decrypt the encrypted frames traveling over the radio. The Zniffer is able to capture every routing attempt and every acknowledge as well as FLiRS beams and even collisions on the radio. This is way more information than you can get via the SerialAPI and is the only way to diagnose many problems you will encounter while developing a Z-Wave based product.
How to make a Super Zniffer
You can’t buy a Zniffer.  You have to make one out of a UZB which is a simple USB stick that provides a COM port that talks to a PC over USB. The ZTS site explains how to convert a UZB into a Zniffer which isn’t easy to do and every time I do it I seem to have about a 1 in 5 chance that I permanently brick the UZB and have to just throw it away (fortunately they are only $25). Once you have the Zniffer firmware loaded into the UZB, use the Zniffer software and make sure it’s working. The UZB works well however it has a tiny helical antenna which means it is limited in its ability to capture all the traffic over the radio. The key to making a Super Zniffer is to tear out the little helical antenna and replace it with a full 1/4 wave antenna.
Solder on an SMA connector
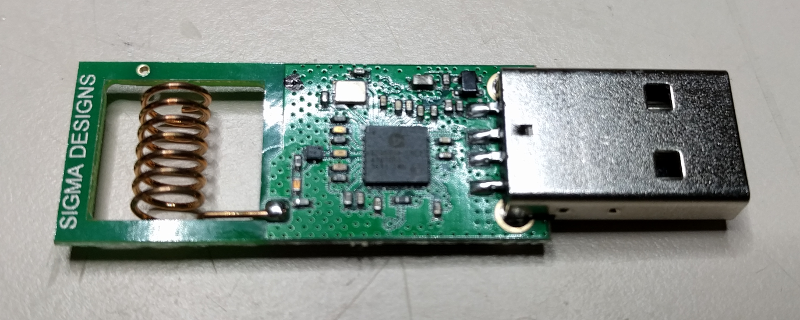 The first step is to pry open the UZB enclosure. Use a small flat head screwdriver to pry it open along the USB connector. There are pins that hold the two halves together. Be careful not to break off the pins as we’ll use the enclosure with the Zuper Zniffer.
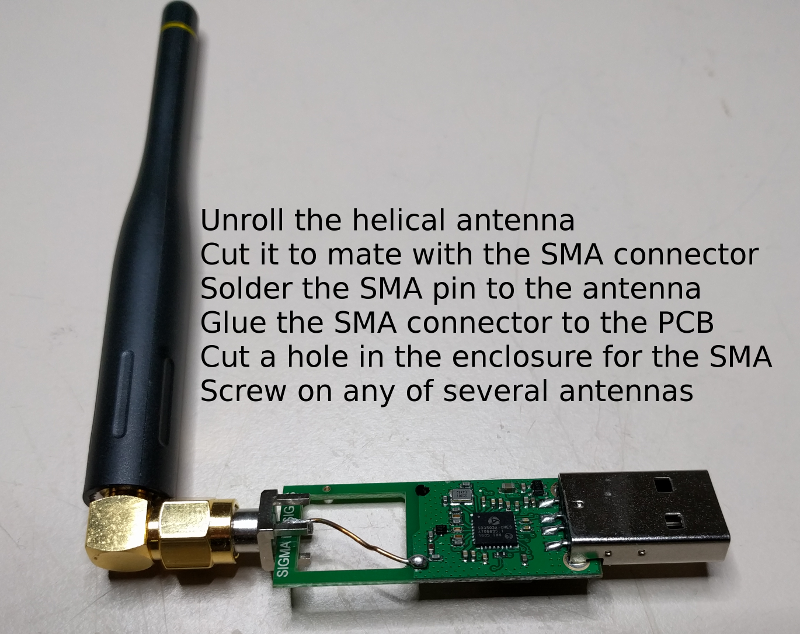 Next unroll the helical antenna and cut it off so it just reaches the end of the PCB. Place the SMA connector on the end of the PCB and solder the antenna wire to the center pin of the SMA as shown above. You can solder the ground pin of the SMA to the PCB ground but it doesn’t seem to make much of a difference. Cut the enclosure to make room for the SMA connector to stick out the end and then snap it back on. Then screw on any SMA antenna and try it out. I typically get 3 to 5 more dB as reported in the Zniffer software RSSI column. This should be nearly 10X more range. There are so many antennas to choose from once you have an SMA connector so experiment and find one that works for you. You can even use a Yagi antenna which would then make the Zniffer highly directional.
Comparing the Zniffer to the Super Zniffer
A regular Zniffer and even the Super Zniffer won’t capture EVERYTHING traveling over the radio waves. That is just the nature of RF. When analyzing the trace in the Zniffer you have to remember that you might be missing frames that your target can see AND that even though you can see a frame it is possible the target didn’t see it. Thus, analyzing the Zniffer trace takes some getting used to.
Here is a typical Zniffer trace:
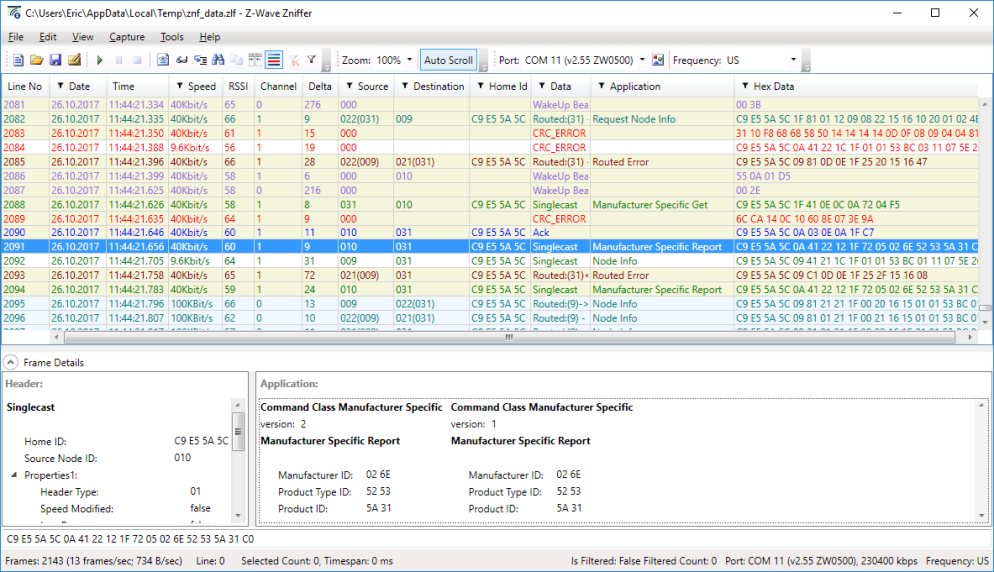
And this is the Super Zniffer trace of the same time when both Zniffers are right next to each other. Compare line 2084 above (the 2nd red CRC ERROR line) and line 2113 below.
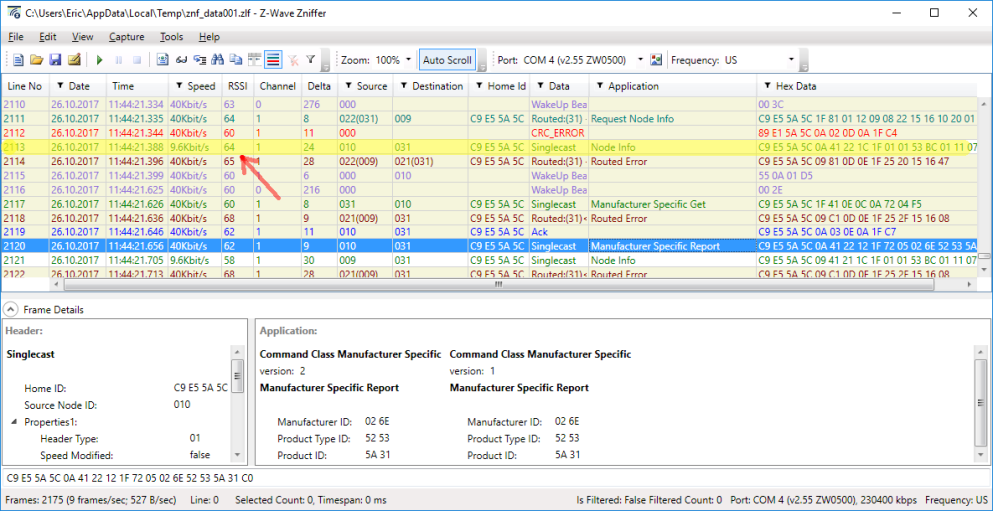
Notice the yellow highlighted line on the Super Zniffer trace. If you compare this line with the one from the normal Zniffer you see the normal Zniffer only recorded this frame as a CRC error and was not able to capture it correctly. Also note that the RSSI is only 56 compared to 64 for the Zniffer indicating the antenna is providing about 8dB more signal strength than the tiny helical antenna of the normal Zniffer. The improved reception of the Super Zniffer makes debugging Z-Wave problems much easier as you aren’t having to sort thru as many questionable frames.

No UZB is ever really bricked. If you check out INS12713, you can reprogram them over the UART test points. I have an FTDI header on mine to switch between Zniffer and SerialAPI binaries quickly.
LikeLike
If you can remove the SAW filter and short the output from the chip to the antenna, you can effectively capture Z-Wave frame of any region
LikeLike
You can remove the SAW filter. But then you have the problem that all sorts of other RF will interfere with your Z-Wave sniffer. WiFi and cell phones will likely result in interference making the Zniffer less capable than if you leave it in place. The saw filter does reduce the sensitivity a little so removing it will help if you’re in a remote area with no other source of RF.
There are only 3 different SAW filters to cover most regions so you can just make one for each region. I suspect removing the saw filter would be worse though I haven’t tried it.
LikeLike
True – no UZB is ever truly bricked. But for $25 it’s easier to buy another one than to spend the time soldering wires to one to reprogram it. I suppose you could make a Jig but I don’t do this often enough to bother.
LikeLike
Eric – Thanks for this post! I love the idea of the Super Sniffer (“Zuper Zniffer”?). I install a remotely accessible Zniffer in multi-unit buildings where we install systems to help with remote troubleshooting. Increased Z-Wave range would be very helpful. Based on your experience building these super sniffers do you have a parts list you’d recommend? What make/model SMA connectors, antennas, etc. have you found easiest to build with? (For example, I see in the above picture the SMA connector has a silver end you’ve glued to the PCB. I can’t seem to find this piece.) Thanks!
LikeLike
All the parts are pretty generic and all are from Digikey. The SMA connector is A97594-ND but there are many similar connectors. There are also lots of antennas which I haven’t had time to experiment with. Some are much larger than the one I’ve been using. It is still subject to noise coming from the PC it is connected to so I continue to recommend plugging the UZB into a USB port replicator or at least an extension cable as the ports on the PCB themselves (especially laptops) are often filled with RF noise.
LikeLike
Didn’t see the instructions to flash the UZB with the zniffer firmware. Can you point me to the link?
Thanks,
LikeLike
Converting a UZB into a Zniffer by flashing the UZB with the Zniffer is a tricky process! It used to be about 50-50 that after reprogramming the Zniffer would work vs. being a brick and tossing it in the trash. Seems like it is working better now as the tools and the swapping of the drivers is more reliable. First step is to use a real windows PC. Don’t use vmware or some sort of virtual machine. Since the drivers get swapped around you need a native Windows machine.
Convert a UZB into a Zniffer
1. Unplug all other UZBs/Zniffers/ZDP03A
2. Plug in the UZB to be converted to a Zniffer
3. Start the PC Programmer
4. Click on Tools->Detect Target
a. This should cause the UZB to disconnect and reconnect as a USB Programming interface with a new COM port
b. If it doesn’t work, open the device manager and select the USB Programming interface driver to force it
2. exit the PC Programmer
3. Start the Zniffer tool
4. Capture->Detect Zniffer Modules
5. It should ask if you want to update the firmware – say YES!
6. The UZB should start programming, disconnect and then reconnect from USB, and finally finish programming
7. Exit the Zniffer tool
8. Remove and then re-insert the UZB
9. Restart the Zniffer and Detect Modules and it should find the UZB and it should just work…
LikeLike
Great thanks for the quick response. Will any version of the UZB work or just the newest?
LikeLike
Any should work but I recommend using the newest uzb3
LikeLike
Hello, Is it possible to do something similar to convert a newer UZB stick (I have UZB-7) to a Zniffer using Simplicity Studio 5? The Zniffer tool never seems to offer to update the firmware.
LikeLike
I guys! For 868mhz (EU/Italy) if found on digikey:
– ACC-UZB3-E-STA (703-1127-ND)
– ACC-UZB3-E-BRG (703-1130-ND)
one is the static, one is the bridge… what’s the right one to apply the above hack and gain a zniffer?
..if is possibile with this stick revision..
LikeLike
Either should work as the firmware will be overwritten with the zniffer firmware. The hardware for both units is the same, it’s just the firmware loaded into it. Given a choice, use the STA version as I haven’t converted a BRG version before but it should work.
LikeLike
Tried following the Zniffer installation guide. I get a Sigma Designs ZWave programming interface (COM6) in Device Manager, but at step 4) Capture->Detect Zniffer Modules, nothing happens. Should I just try to flash the appropriate HEX file directly using the Programming Tool?
LikeLike
Yes. you have to use the PC Programmer to program the proper Zniffer hex file. Then unplug the UZB and plug it in again and this time Detect Zniffer modules in the Zniffer tool. It may decide to download the firmware again to a different version. Be sure to download the latest version of both programs from the Silabs web site. The older versions of the software often would brick a UZB. There is still a decent chance that the conversion of a Static Controller into a Zniffer will brick the UZB but the newer versions seem to significantly lessen those chances.
LikeLike
I’m not having much luck with the programming and it seems so simple. I have 4 of them, no bricking, and same results. Even using two Win10 PCs just to be sure.
Z-Wave Programmer is the latest v2.99. Programs successfully, I see it disconnect in device manager, and then reconnect. I use sniffer_ZW050x_USBVCP.hex located in the latest zniffer package.
Then I use Z-Wave zniffer v4.60.173. I see my sniffer identified in the COM box with v2.55 and with us frequency. I hit capture. I get the need to program firmware which I allow. That always results in the ErrorCantSetProgrammingMode. The user guide says “keep trying” with specific steps, which I follow with the same results. Maybe tried 40 times?
Not sure if something has changed? I did notice that Silabs auto downloads v4.57 of zniffer but this later version is available and newer. I’ve tried that version as well with identical results.
I’m using the same programming driver between programmer and zniffer with an unplug and replug in between. I suspect that is correct.
Any ideas? Any other backdoor FTDI or debug header method?
LikeLike
Turns out, replacing the programming driver with the UZB driver (uzb.inf) after using Programmer, but before switching to zniffer is what was needed. After that, all of mine accepted the zniffer firmware update and started capture.
LikeLike
Getting the combination of drivers to properly switch is the challenge for re-programming the UZBs. This is why trying to do this thru a Virtual Machine is nearly impossible. Even a native Windows machine it can be a challenge.
LikeLike
Hi,
do you know if the Zniffer Software also works for a UZB Stick from z-wave.me? (https://z-wave.me/uzb/)
I am quite new to this topic and I am trying to use the Zniffer to deepen my understanding of the Z-Wave protocol.
Cheers
LikeLike
I haven’t tried it so I can’t comment. The UZB stick is available from Digikey.com for $25 so it is pretty cheap.
LikeLike
Hey, just to let you know; it seems to work, but I am not sure if the UZB stick is able to see all packets. At least I have the feeling that some are not getting sniffed.
Please send me an email for more information about it.
LikeLike
Any sniffer of Radio Communication is not going to “hear” everything. Depending on how close you are to one end of the two units communicating and many many other factors it is very common to not quite hear everything. Plus, it is common that the sniffer can hear something but the device didn’t. You often see an ACK on the sniffer but the sender will go ahead and send the packet again because it didn’t hear the ACK. So you have to look closely at the traffic and interpret what was heard and what was likely not heard.
LikeLike