Packet sniffing is critical for debugging any wireless IoT product and Z-Wave Long Range (ZWLR) is no exception. The challenge with ZWLR at the moment is that you must use a WSTK Pro Developers Kit and connect it via Ethernet AND USB. See my Unboxing the 800 Series video for a demonstration and more details on how to set up a WSTK so it is both a SerialAPI controller and a Zniffer at the same time. The challenge with this setup is that since the WSTK requires an Ethernet interface, you need a router and perhaps a switch and specifically a DHCP server to connect the Zniffer via Ethernet. This is easily done when at the office or even working from home, but I’ve been doing some Long Range testing at a remote site with no power or Ethernet let alone the Internet and a router/switch. But in this post I’ll show you how to wire up Ethernet point-to-point without a router. I expect needing both Ethernet and USB for the Zniffer will be solved in a future SDK release but to get things done today I offer this solution.
I have a Windows 10 laptop so that’s the help I can provide but Mac or Linux users I assume can find similar solutions. I don’t normally use the Ethernet jack on my PC so I can alter the Windows settings and leave them this way as I use either WiFi or a USB-C port expander when I am in my office. If you use the Ethernet jack on your PC, you may want to buy a USB to Ethernet adaptor for this specific purpose to avoid having to constantly change the settings.
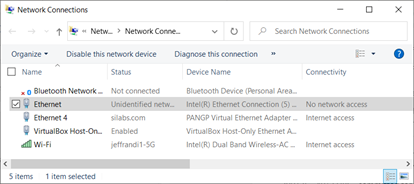
On the Windows10 PC – go to Control Panel\Network and Internet\Network Connections and Select the desired LAN interface. In my case it’s the Ethernet interface on the motherboard. If you connect the WSTK to the interface you’ll see it show up as “no Internet” but connected.

Double click the desired “interface”, then select Properties and scroll down to TCP/IPv4 and click on it and enter the IP address 192.168.1.1 as shown here:
click OK in both windows. This changes the PC Ethernet interface to a fixed IP address and apparently also provide IP addresses to connected devices.
Open Simplicity Studio (SSv5) and then Commander (Tools->Simplicity Commander)
Plug the devkit and the PC together using both USB and Ethernet.

In Commander select the USB kit number in the Select Kit drop down. Then edit the Network Information and enter as shown here:
The devkit should then get assigned an IP address of 192.168.1.2 in several seconds and then show up in SSv5 as connected via both USB and Ethernet.
Open the Zniffer application and click on Capture -> Detect Zniffer Modules if the IP device doesn’t already come up in the drop down menu. Select the IP address then click on Start and trigger some Z-Wave traffic to make sure the Zniffer is working.
When you later return to the office and want to connect the WSTK to a real network with a DHCP server, use Commander and the USB interface to go into the Network Information and select Use DHCP. The WSTK should then properly negotiate for an IP address on the network and automatically show up in the Zniffer.
Hopefully this solution is only needed for another quarter or two as we’ve had many requests to make a much easier to use ZWLR Zniffer solution. Someday I hope we would eventually switch to a Wireshark based solution but for now we have the Zniffer as-is.

One last Zniffer recommendation is to also click on View then enable All Frames to be sure you can see the wakeup beams and CRC errors.

What about with the ZGM230-DK2603A? Any options there to make it a Zniffer? It is only a USB C connection.
LikeLike
YES! The Thunderboard can be a Zniffer in the 7.20.1 SDK released last week! Come to the Z-Wave summit in Orlando in Sept and I’ll demonstrate! https://z-wavealliance.org/eve/z-wave-summit-member-meeting-unplug-fest-2023/
LikeLike