EZMultipli How-To for HomeSeer HSM200

HomeSeer HS3 is my favorite smart home software. I use the HomeSeer HomeTroller Zee S2 to run my home. The Zee S2 is a Raspberry Pi (RPi) with a built-in Z-Wave interface that runs the HomeSeer HS3 software. The part I like the most about HomeSeer is that the processing runs locally on the RPi which makes the response time very snappy compared to the cloud based systems. The RPi has plenty of horsepower to serve the web pages and run the events that control my home automatically and it does it all with a mere 6 Watts of power. Compared to having running on a PC 24/7/365 at typically 60+ watts, the RPi is a green and low-cost alternative. HomeSeer has a very active user community on their forums and if you have a question on how to do something, just ask and someone will respond quickly. HomeSeer sells the EZMultipli under their own brand name as the HSM200. For this post I’m going to show you how to get the most out of Express Controls EZMultipli Z-Wave MultiSensor and specifically how to use it with HomeSeer. Refer to the User Manual for more details on EZMultipli/HSM200.

ezmultipli200EZMultipli Multisensor

The EZMultipli performs five functions:

  1. Motion Sensor
  2. Temperature Sensor
  3. Light Level Sensor
  4. Color LED indicator
  5. Z-Wave Range Extender

What sets the EZMultipli apart from the typical battery-powered motion sensors is that it is wall powered so you never need to change the batteries! Because EZMultipli is wall powered it is a Z-Wave range extender and adds another routing node in the Z-Wave mesh network. If your Z-Wave network is a little flakey and you have some nodes that are having trouble reporting in reliably, adding an EZMultipli or two will provide additional routes for every Z-Wave node to talk to every other node. The sensors are just a bonus in that case!

Because EZMultipli is simply plugged into an outlet, there is no mounting required. No screws, no tape, no mending of the wall when you move. This makes EZMultipli ideal for apartments, offices or other short-term uses where you’ll want to take it with you when you leave. But what if you don’t have an outlet in the right spot for detecting motion? Ah… that is a problem and not every device can solve every problem. EZMultipli was specifically designed with a wide-angle lens to capture motion in any direction out to about 12 feet. So it doesn’t have to be placed in the perfect location to be able to detect motion where you need it. It is ideal for kitchens, bathrooms and garages which often have unused outlets in handy locations. You can also put it in unused outlets under a table or chair. Obviously it isn’t much good behind a couch or other solid furniture. Some locations like hallways will have to use a battery-powered motion sensor because the sensor has to be in just the right place and there are no outlets in that place.

Another placement problem involve pets. If you put the sensor down low in a typical wall outlet, virtually any pet from a cat to a small dog will trigger the motion sensor. You have to either put the sensor up on a higher outlet or in a room that pets are not allowed in when you need to detect if a burglar is in your home. In my case we always close off our home office from the pets during the day when we are not home. Only the EZMultipli in the office and the one in the garage will send us a text when the home is in Away mode.

HomeSeer Motion Events

Now that we have a sensor in an outlet that will detect motion, what do we do with that information? Naturally the most common thing is to turn lights on and off and to send a text when motion is detected and the house is in Away mode (security is enabled).ezmeventonoff

These two events are the most basic ways to control a light with motion. The light will come on when motion is detected but only if it is after sunset and before sunrise. When the sensor has not detected motion for several minutes it will change state to No Motion and the light will be turned off. Note that I also turn the light off at sunrise just to be sure its off during the daytime. The light I’m controlling with these events is the color LED of the EZMultipli itself and you can set the color to any of eight different colors.

Z-Wave Association Direct Control of Lights

EZMultipli also supports the Z-Wave Association Command class. Associations are used to tell EZMultipli to send ON/OFF commands directly to other Z-Wave devices without requiring events or even talking to HomeSeer. The advantage of Associations is that it results in very fast response times and even if HomeSeer isn’t running the lights will come on and off automatically.

Setting associations in HomeSeer involves first clicking on the root device of the EZMultipli or HSM200. Then click on the Z-Wave tab as shown here.

ezmhs3assoc

Click on the little yellow triangle to open the Associations menu. Next click on Update which will cause HomeSeer to double-check the associations set in the device. HomeSeer automatically assigns itself to Group 1 so that it will get the Motion/NoMotion Notifications. To turn lights on and off directly from EZMultipli, Click on the Association Group drop down menu and select Group 2. Then pick the device to be controlled and then Add Association. I recommend then clicking on Update again just to be sure. It is also a good idea to click on Full Optimize which will improve the Z-Wave routing thru the mesh network. Once this is done, the light in Group 2 will turn on when motion is detected and off after motion is no longer detected for 10 minutes.

Configuration Parameters

EZMultipli has five configuration parameters that change how the device responds to various events.

  1. OnTime – Number of minutes the light will stay on when motion is not detected
  2. OnLevel – Dim level sent to Association Group 2 nodes
  3. LiteMin – Number of minutes between luminance reports
  4. TempMin – Number of minutes between temperature reports
  5. TempAdj – Temperature adjustment

The most important parameter is the OnTime parameter. As the name implies, OnTime is the number of minutes the lights will be ON after motion stops being detected. When you walk within range of the motion sensor, HomeSeer is sent a Motion event immediately. HomeSeer (or via Group 2) can then turn lights on. Let’s say you then walk around the room for 5 minutes and then walk out of the room. Then 10 minutes later, HomeSeer will be sent a No-Motion event. Why 10 minutes and not 5? Because OnTime defaults to 10 minutes which starts counting down when you left the room, not when you entered. Here are some recommended values for the OnTime parameter:

  • OnTime=0 disables sending OFF commands. Only ON commands are sent. This setting is not recommended with HomeSeer.
  • OnTime=1 is the minimum setting. Use this value in collaboration with HomeSeer Timers to vary the off time based on the time of day. For example, late at night you could set the timeout to be only the 1 minute since you’re probably just passing thru. But at dinner time you want a much longer timeout of 30 minutes to prevent HomeSeer from turning the lights off at the dinner table while you are eating dinner. Having to wave your arms in the air in the middle of dinner to turn the lights back on will lower your Wife-Acceptance-Factor (WAF).
  • OnTime=5 minutes is generally a good setting for hallways or other places that you are actively moving thru and only need the lights on while moving thru the space
  • OnTime=10 default setting which is OK for many use cases.
  • OnTime=30 minutes is recommended for rooms where people might be sitting for some time like an office or watching TV.
  • OnTime=60 minutes or more might be necessary for a room where someone might be sitting for a long time perhaps reading.

Remember that EZMultipli detects MOTION, not people. So the people have to be moving within range of the sensor otherwise the lights will turn off while they are still in the room!

Refer to the EZMultipli User Manual for details on the other parameters.

To change parameters, click on the root device from the Home screen and then the Z-Wave tab and then the Settings yellow triangle to get the screen shown here.

ezmhs3config


HomeSeer knows about parameters 1, 3 and 4 but you can adjust any parameter via the Set Configuration Parameters box at the bottom of the screen. You have to “Use at your OWN risk” but the parameters are straightforward enough – I think you can handle it. The biggest challenge with parameters is setting values greater than 127. Officially all parameters are supposed to be twos-complement but you can enter values greater than 127 by using the twos-complement equivalent.

Well that should get you started using EZMultipli with HomeSeer. Future posts will include more advanced usage of the color LED and how to implement a variable timeout. If you have an interesting use case for the HSM200 please add a comment or send an email to DrZwave at ExpressControls.com.


Seven Habits of Highly Effective Z-Wave Networks for Consumers

You have a Smart Home using Z-Wave as a wireless technology for all these Internet of Things (IoT) devices to communicate with each other. But maybe things are not working quite as well as you expect. You press a button on your phone and 1… 2… 3… and then finally a light comes on or maybe it doesn’t come on at all! Another common problem is when a battery powered sensor was updating the temperature last week and this week it just doesn’t seem to be sending updates anymore or at best sporadically. As a Z-Wave expert I’ve built and rebuilt hundreds of Z-Wave networks and have come up with a few habits to make Z-Wave networks more reliable.

1. Minimize Polling

This is probably THE number one mistake new users of Z-Wave make. They figure Z-Wave is a high speed network so they can just poll a light switch every 3 seconds and then react to any change in the switch. Z-Wave and most other wireless networks work best when the network is highly available. If the network is busy, every device that needs to send a message has to wait its turn and then compete (and often collide) with all that polling traffic. Collisions slow everything down just like rubber-necking on the highway.

Polling used to be the only way to get around a patent that fortunately expired in February 2016. The patent forced many light switch manufacturers to not send a message when you flipped the switch. Several manufacturers found ways to get around this or they licensed the patent. But now that the patent has expired, you can get light switches that do send a report immediately when their state has changed.

So the primary way to minimize polling is to replace the few devices in your Smart Home that trigger an event  (or SmartApp or Magic or whatever your hub calls it) with one that will instantly send an update. If you have some older switches but they’re not that important to instantly know their state has changed, you can still poll them but no more than once every few minutes. Remember that if you have 60 Z-Wave devices and you poll each one once/min then you are polling once/second and the network is hammered! So only poll a couple of nodes!

2. Have enough devices to create a mesh

I can’t tell you how many people I’ve worked with that had a door lock and a hub and nothing else, maybe a battery powered thermostat. And they wondered why the connection to the lock was unreliable when the hub was at the far end of the building! Z-Wave relies on Always-On (110VAC powered) nodes to build a “mesh” network. The mesh is the key to Z-Wave reliability. Every Always-On node acts as a repeater in the mesh and is able to forward a message from one node to another in the mesh. But only the Always-On nodes can forward a message. Battery powered devices like door locks and battery powered thermostats cannot forward messages. Only the Always-On nodes can.

Solution: If some devices are not reliable, add more Always-On devices. Add a Z-Wave repeater or any device like a lamp dimmer. Even if you don’t use the lamp dimmer it will act as a repeater and improve the network. I have a few lamp switches I use for my Christmas lights which I leave plugged in year round because they help the Z-Wave network since these nodes are at the periphery of my home.

Distance between nodes is not always the criteria for adding more nodes in a network. The Z-Wave radio signals may bounce off metal objects like mirrors or appliances and cause two nodes that are only a few feet apart be completely unable to talk to each other due to reflections of the radio signals. Adding more nodes in the mesh provide alternate routes to nodes that otherwise might be in a dead zone due to these reflections cancelling out the radio signals.

3. Place the hub in a central location

Putting the hub in a corner of the basement might be convenient, but its a terrible idea for Z-Wave. The hub is the most important node in the network and should have the best location possible. While Z-Wave is a mesh network and can route or hop thru other nodes in the mesh, each hop is a significant delay and chokes up the network with more traffic. Ideally the hub should reach 90% of the nodes in your Smart Home without relying on routing. If the hub has Wifi then putting it in a central location is easy, you just need a wall outlet to plug it in. I have my hub hung off the back of a TV cabinet in roughly the middle of the first floor of my home.

4. Heal the Network

Once a Z-Wave network is built, it has to be “healed” so every node can use all the other nodes in the network to route messages. This healing process can take many minutes to even hours depending on the size of the network. When you first build a Z-Wave network, the first node added only knows that the hub is in the network. When you add a second node, the hub knows that both the nodes are in the network but the first node you added has no idea that node 2 is there – unless you heal the network. So any time you add a node, you need to heal at least a few nodes in the network if not the entire network. Be cautious with the healing process – it uses 100% of the Z-Wave bandwidth during the process and every node will wake up every FliR node (door locks) at least once which will drain the batteries of the FLiR node. Generally only heal when nodes have been added or removed or if there seems to be a problem in the network.

Z-Wave is able to self-heal automatically. Z-Wave nodes will try various routes to get their message thru if at first it doesn’t succeed.  The node will remember the Last Working Route and try that one first for the next message. But if the nodes have no idea there are other nodes in the network they have no way of knowing what routes to try so at least one full heal of the network is required.

HomeSeer

homeseerheal
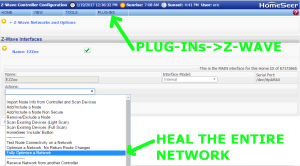
HomeSeer has several platforms so the precise method might be slightly different than shown here. From the web interface home page select the menu Plug-Ins->Z-Wave->Controller Management then select the Action “Fully Optimize a Network”. The network wide heal will take some time depending on the size of the network.

SmartThings

SmartThings Expert Z-Wave Eric Ryherd DrZwave
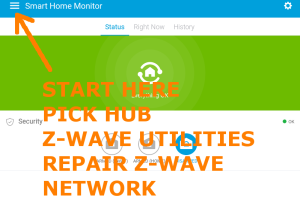
SmartThings  user interface is thru their app which makes finding the network heal a bit of a challenge. Start from the dashboard and click on the three lines in the upper left corner. Your Hub should be the first choice in the menu that slides out, click on your hub. A new menu comes up, click on the last choice “Z-Wave Utilities”. The last choice on the next menu that slides in is “Repair Z-Wave Network” so click on it and then click on “Start Z-Wave Network Repair”. The repair will take from minutes to over an hour depending on the size of your network.

Vera

veraheal
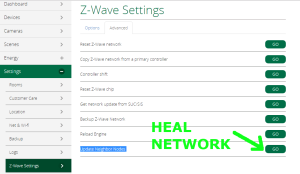
Vera has several versions of their UI but each of them has a similar menu structure so these instructions should work on any version. The Vera version shown here is UI7. Use a PC to log into GetVera.com and select your hub. From the Dashboard, select Settings->Z-Wave Settings and then click on the advanced tab. At the bottom of the advanced tab is the GO button to run the “Update Node Neighbors”. Depending on the size of the Z-Wave network this process will take several minutes to over an hour.

5. If a device doesn’t pair, first exclude it, then include it

You’ve taken the brand new Z-Wave IoT widget out of the box and you’ve tried to pair it (the Z-Wave term is “inclusion”) but it just won’t include! Arrrghhh! The first thing to try is to exclude the node first and then try including it. Any hub can “reset” or exclude a Z-Wave device even if that device was previously connected to another network. Some manufacturers occasionally fail to exclude the device during testing so the device may already be connected to their test network. Z-Wave Expert IoT WirelessOr you may have inadvertently included the device but the inclusion process failed somehow and the hub is confused. Excluding the node should reset it to the factory fresh state. Newer Z-Wave Plus devices (which have this logo on them) are required to have a way to reset them to factory defaults using just the device itself. Every device is different so you’ll have to refer to the device manual to perform a factory reset but if all else fails this should make the device ready to pair. Naturally having the hub physically close to the device being paired will also help though most devices can be paired from a distance.

Secure devices like door locks are particularly challenging to pair. First the secure device has to join the Z-Wave network, then the AES-128 encryption keys have to be exchanged and if that process fails (which it does on occasion), then you have to exclude and try the inclusion process all over again. Secure devices definitely want to be within a few feet of the hub during inclusion to ensure reliable and speedy Z-Wave communication.

6. Battery life and how to maximize it

When a battery powered Z-Wave device wakes up and turns on its radio, it uses 10,000 times more battery power than when it’s asleep. So the entire trick to making batteries last is to minimize the amount of time the device is awake. Some devices naturally have other battery draining activities mostly involving motors to throw a deadbolt or raise a window shade. Obviously any motor will use a lot more battery power than the Z-Wave radio but the radio will play a significant role in battery life.

When a battery powered device is added to a Z-Wave network the hub should do two things:

  1. Assign the Association Group 1 NodeID to the hub
    1. Association Group 1 is the “LifeLine” in Z-Wave and devices use this lifeline to send all sensor data and alerts to this node
    2. All hubs are required to assign Group 1 but double check this assignment
  2. Set the Wake Up Interval to no more than once per hour and ideally only a few times per day
    1. Every hub assigns the WakeUpInterval differently and largely handles it behind the scenes so this may be difficult to verify or change
    2. If the device is waking up every few minutes and sends a sensor reading then its battery life isn’t going to be more than a few weeks
    3. The battery level of the device is usually reported at the WakeUpInterval  rate

Many sensors have other Association Groups or Configuration Parameters that will let you specify the frequency of sensor readings. Realize that the more often the sensors report in, the shorter the battery life.

7.  Dead nodes in your controller

One of the big problems in Z-Wave network maintenance is eliminating “dead” nodes. When a device fails or for whatever reason is no longer in use, then it needs to be removed from the controller. If it remains in the controller then the controller will try to route thru this dead node on occasion resulting in delays in delivering messages. Eventually the self-healing aspects of Z-Wave will make this less likely but various devices will on occasion attempt to route thru it. Since the node is dead, that wastes valuable Z-Wave bandwidth and potentially battery power of sleeping devices. Occasionally running a Heal on the network will remove the node from the routing tables but it will remain in the controllers routing tables. It is best to completely remove this dead node. Each hub has a different method for removing dead nodes and usually requires going into an advanced Z-Wave menu.

Following these guidelines will help your Z-Wave experience be more robust. If you have more questions please feel feel to reach out via email to drzwave at expresscontrols.com.

Z-Wave Repeaters cannot test FLiR Nodes using Power Level CC

The Z-Wave Power Level Command Class has a number of very handy (but rarely used) commands to test and maintain a robust Z-Wave network. Power Level CC is required to be supported by all Z-Wave Plus devices so any new device on the market supports it. The purpose of this command class is to measure the quality of each link in the Z-Wave mesh network. Naturally, some devices have good links and some have not so good links. Some devices have really good antennas and are placed in good locations, others have terrible RF antennas and are stuck inside a metal box with only one side exposed and down a long concrete hallway. Power Level CC helps you figure out which links are strong and which links are weak. Informing the user that some links are weak and giving them the recommendation to install another node into the mesh to strengthen the links and make the network robust will make for a superior user experience.

Power Level Test Node Set

The POWERLEVEL_TEST_NODE_SET command has the following parameters:

  • Test NodeID (1-232)
  • Power Level (0-9)
  • Test Frame Count (2 bytes, MSB first)

The device that receives this command will send Test Frame Count NOP packets at the Power Level to the Test NodeID. The Test NodeID will ACKnowledge each NOP that it receives. Once the device has sent all the NOPs, it will return the number of NOP ACKs were received. Simply put, this command returns the percentage of packets that can be exchanged between these two devices at the power level chosen.

Sending a few dozen packets at different power levels enables the quality of the RF link between the two nodes to be measured. Do this with all the nodes in the mesh and you can build up a view of the mesh with different colored links between them based on the quality of the RF link.

Learning – you can’t send a Test Node Set to test FLiR nodes

While attempting to use this feature, I found that you can’t send NOPs to FLiRs (Frequently Listening Routing Slave). FLiRs nodes are a special type of node in Z-Wave. They are battery powered devices that can wake up when you call them! Basically they wake up once per second and briefly listen for a special WakeUpBeam. If they hear it, then they wake up and you can talk to them. Since they are asleep most of the time they use very little battery power and have a little latency but otherwise are great for things like door locks, window shades or thermostats.

The problem with Power Level Test Node Set is that the command does not tell the device that is sending the NOPs that the Test NodeID is a FLiR node and has to send a wake up beam to it. Thus, if you send the command, all you get are complete FAILs since the FLiR node has been asleep all this time because the sender didn’t tell it to wakeup.

Sigma stated that sending an AssignReturnRoute command to the repeater to give it a return route to the FLiR node the repeater should then know the destination is a FLiR node. I tried this with a repeater running SDK 6.51.06 but the repeater still did not send a WakeUpBeam so this isn’t a solution yet.

Workaround – Send the Test Node Set to the FLiR node to test the repeater

The solution to this problem is to reverse the testing and send the Test Node Set command to the FLiR node with the repeater node as the Test NodeID. A WakeUpBeam will be sent by the controller (and any repeaters in the mesh network) to send the Test Node Set command to the FLiR node. Once that node receives the command, it’ll blast out the NOPs to the always-on repeater and then send you a report when it’s done.

Well, you can only do this if the FLiR node supports PowerLevel Command Class. Unfortunately, door lock manufacturers  move pretty slow so their firmware may not support PowerLevel CC yet.

I’ve been wanting to use Power Level CC to show some cool mesh network quality drawings but haven’t had the time to do it… yet… Stay tuned…

DrZwave Bio – IoT Expert using Z-Wave

Welcome to my blog where I’ll shed light on some of the mysteries around Z-Wave and the Internet of Things (IoT). Along the way I’ll post examples of the best ways to do things with your Z-Wave devices and some cool ideas on things you can do with Z-Wave devices. Look for reviews of Z-Wave devices and software that will make your home into a SmartHome.

I make my living by helping Z-Wave developers implement Z-Wave technology into their IoT devices. Several categories are specific to these folks and are a bit heavy in the technical details of Z-Wave so for you Z-Wave users you might want to stick to the reviews and Hubs sections. My company is Express Controls so if you need some help with Z-Wave check us out and we can help you get your product to market quickly.

Biography

Z-Wave Expert Eric RyherdI went to RPI in the early 1980s where I honed my skills soldering and writing software. My first two jobs were designing graphics workstations and some of very first (and very primitive) GPUs of the day. I went on to designing chips for video conferencing compression engines, the cockpit display of the F22 fighter, Wireless Ethernet (before it was a standard) and a variety of chips for big and mostly small companies. Most of the chip designs were done as a contractor while I was also starting my first company, VAutomation which made “cores” for 8 and 16-bit CPU as well as USB and Ethernet interfaces. I sold VAutomation in 2001 and started playing with Z-Wave in 2003. I am the 31st Z-Wave licensee (there are now several hundred). At that time I went to work for a camera chip company that Cypress Semiconductor purchased and then I moved into working for Cypress. Since 2014 I have been building Z-Wave IoT devices before the Internet of Things (IoT) was a “thing”.