My father is a cantankerous curmudgeon but at 89 years old he deserves to be a little crusty. In his infinite wisdom at the age of 79 he decided to move away from his family here in New England and purchased a home in warm sunny Florida. He was happy he no longer had to freeze in the cold of winter but I was unhappy because now he was 2,000 miles away and I worried something might happen to him. If someone broke in or if he fell no one would know potentially for weeks. To ease my worries I applied my technical expertise and deployed an inexpensive Z-Wave based system to keep an eye on him.
HomeSeer to the Rescue

HomeSeer sells a Raspberry Pi based Home Automation system with a built-in Z-Wave interface called the Zee S2. This small box needs only 6 Watts of power but contains a complete Linux computer that can serve web pages and runs the HomeSeer HS3 application. My initial system was just the HomesSeer Zee S2 ($199) and two Express Controls EZMultiPli Multi-sensors ($99) for a total cost of $300 for my peace of mind. No monthly charges, no “monitoring fees” or any other costs so this is indeed a low-cost solution. All of the Z-Wave devices just plug in with no wiring, no batteries and everything pretty much plug-and-play. In less than an hour the system went from the box to fully installed and the web interface up and running via my phone or computer.
The HomeSeer system is accessible 24x7x365 via their portal at myhs.homeseer.com. No complex router tunneling or anything like that – just plug the Zee S2 Ethernet cord into  the router and then login to it from anywhere in the world. The system is secure and password protected. The HS3 application serves web pages with a status of every Z-Wave device. The HS3 application runs on the Raspberry Pi so all processing is local which means temporary Internet connectivity outages are no problem.
The HS3 user interface shown here is utilitarian which is fine for this application. HomeSeer has an easy to use IF-THEN “events” page which is quite powerful. The HS3 system constantly monitors the motion sensors and depending on the time of day sends me a text anytime there hasn’t been motion detected in the house for more than 5 hours. I placed a motion sensor next to his bed and another in the kitchen. Since he typically would get up several times each night, my 5 hour time limit rarely false-triggered. The trigger was extended longer during the day since he would be up and around the house and not in the bedroom for more than 8 hours at a time.
Nothing is Perfect
When I first put the system together, it seemed to work reliably. However the Zee S2 unit was installed at the far end of the house near the cable box. The kitchen motion

sensor was about 25′ away and the bedroom one was another 20′ away and had to pass thru several walls, the HVAC system and a bathroom. With only 3 nodes in the Z-Wave network I violated one of the key rules of a mesh network – always have more than two routes to every device. In this case I had exactly one route to each device so I didn’t have a mesh and the result was a number of false triggers because the bedroom motion sensor occasionally couldn’t reach all the way back to the Zee S2.
I was frustrated because I left what I thought was a working system but soon turned out to be unreliable. Now I was 2000 miles away and had to suffer with this system for nearly a year before my next visit to Florida. The solution was to add a few lamp modules and another multi-sensor so now I had 7 nodes with several routes to all nodes. Now the system was reliable and did not false trigger. I added an event that automatically turned on a lamp in the family room whenever motion was detected. My father really liked this feature as he always had light as soon as he entered and it would automatically turn off when he had left the room.
I thought things were pretty robust at this point but my next Achilles heel turned up rather quickly. Something caused the Raspberry Pi to crash. I couldn’t log into it and it was no longer sending me the daily emails telling me what time my father had gotten up in the morning. After nearly 2 months the system just suddenly started sending me the daily emails again. Apparently a power outage had in effect rebooted the HomeSeer system. On my next visit I put the entire system on a power strip that my father could reach so he could reset the system. I still want a power strip that has a watchdog timer function and if it doesn’t get some sort of “ping” every hour or so, it reboots everything downstream.
He Takes a Fall
At 2:39am one morning in mid-November 2017, my father fell in his bedroom. He was unable to get up. He was unable to call for help. My HomeSeer system sent me a text at 7:39am stating he had not gotten up. That seemed like an odd time for him to not get up so I tried to call him. After several calls with no answer and checking the HomeSeer system to see that there has been no changes since 2:39am I became concerned. I had the Sheriff stop by and check on him and it turns out he was on the floor, awake but unable to move. The EMTs were called and he was taken to the hospital. In just 5 hours he was already dehydrated and would have slowly died a painful death in a day or so if my system had not been in place. The Z-Wave system saved my fathers life.
Looking back on it now, I had noticed that his morning schedule had started to vary significantly from day to day. For years he had been getting up at a pretty predictable time of around 10am. But in the months prior to his fall, his schedule had started to vary from 8am to as late as 1pm in the afternoon. When we talked on the phone he said he was fine but clearly he was struggling. He enjoyed being warm in Florida and he was happy and I was confident that my Z-Wave system would alert me to any major problems which it did.
 Features
 Sigma Designs
  The EZMultipli performs five functions:
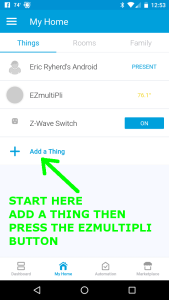 Another placement problem involves pets. If you put the sensor down low in a typical wall outlet, virtually any pet from a cat to a small dog will trigger the motion sensor. You have to either put the sensor up on a higher outlet or in a room that pets are not allowed in when you need to detect if a burglar is in your home. In my case we always close off our home office from the pets during the day when we are not home. Only the EZMultipli in the office and the one in the garage will send us a text when the home is in Away mode.
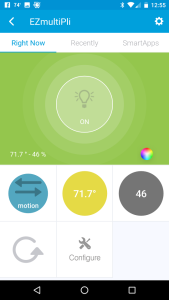 Include EZMultipli into the ST hub in the normal way: Just click on the
  At this point, the best thing to do is to click on the Gear icon in the upper right corner. This brings you to the configuration screen where you can adjust various parameters to suite your needs. Generally the defaults will work fine for most applications. The next section will get into more details.
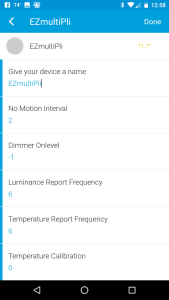 EZMultipli has five configuration parameters that change how the device responds to various events.
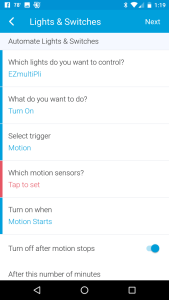 Now that you have a motion sensor, the most common thing is to turn a light on or off when there is motion or not. In ST that is done using a SmartApp. Go back to the home screen and click on Automation at the bottom. Then click on
  EZM which is the motion sensor
 With the plugin installed there are three more devices but the only one that is interesting is the EZM Light 2 which has the 8 LED color buttons as shown here. Assign that device to the same room as the other EZMultipli sensors. I create a virtual room called ZZZVirtual to put all the extra stuff I don’t normally want to see so it’s at the bottom of the screen.
 To change parameters, click on the > on the EZM device and then the Device Options to get the screen shown here. If there are no configuration settings shown, click on the Add Configuration Settings button and one will be created. Select “1 byte dec” in the Data Size field then enter the desired value for the OnTime parameter in the Desired Value field. Then click on Save Changes.


