Detecting RF Jamming

Cheap RF Transmitter

All wireless protocols can be jammed often using an inexpensive battery powered transmitter. The protocol doesn’t even have to be radio frequency (RF) based as Infra-Red (IR) and any other communication medium that travels thru the air can be jammed by blasting out noise in the same spectrum as the protocol. Think of a busy street corner where you and a friend are having a conversation and a firetruck with their sirens blareing go by. Your conversation stops because your friend simply can’t hear you above all the noise. The same thing can happen in Z-Wave where a “bad actor” brings a small battery powered transmitter and blasts out RF in the same frequency bands that Z-Wave uses. In this post I’ll explain how to jam Z-Wave and also how to detect and inform the user that jamming has occurred.

Security System Requirements

Jamming applies primarily to security systems. After all, if someone wants to jam your house from turning on the kitchen lights at night, what’s the point other than to get a laugh when you bang your knee into the table? Z-Wave has enjoyed a great deal of success in the security system market. Z-Wave is interoperable, easy to use, low-power and the mesh networking protocol means users or installers don’t have to be concerned with getting everything to talk to everything else as the protocol automatically handles (mostly) everything. Security systems however are very concerned about jamming to the point that Underwriters Laboratory has a specification for it. UL1023 is the US standard for Safety Household Burglar-Alarm Systems.

The reality of the situation for a security system is that it is unlikely a burglar will try to bypass your security system by jamming it. Burglars are simply not that tech savvy. The FBI doesn’t even track the numbers of burglaries via jamming – one would assume because the number is essentially zero. A burglar will simply bash in a window or door or more often simply walk in an unlocked door. However, if it’s easy enough and cheap enough, a burglar might just try! CNET demonstrated just how easy it is to use a $3 transmitter to bypass a popular security system using a cheap RF transmitter. Regardless of the reality of the situation, the bad press of having an easy to jam security system can crater a company.

Anti-Jamming Techniques in Z-Wave

Z-Wave was designed from day one to be robust and reliable. The very first requirement for robustness is to acknowledge that the device receiving the message did in fact receive it. Every Z-Wave message is acknowledged (ACK) otherwise the sender will try again using different mesh routes or other RF frequencies. After several retries, the protocol will give up and the application can then decide if it wants to try even more ways to deliver the message. If the message is not very important (like a battery level report), the application can just drop it. If a sensor detects smoke! Then the application will continue trying to get this life-safety message thru in every way possible for as long as possible.

Z-Wave requires two-way communication – all messages are acknowledged

Here’s a list of the techniques Z-Wave uses for robustly delivering messages:

  • Z-Wave
    • All frames are Acknowledged
    • Multiple mesh routes
    • Frequency Hopping – Two frequencies – 3 different baud rates (in US)
    • RSSI Measurements indicating jamming
    • Supervision CC confirms decryption & data integrity
  • Z-Wave Long Range
    • All frames are Acknowledged
    • Dynamic TX Power
    • Frequency hopping to alternate channel
    • RSSI Measurements indicating jamming
    • Supervision CC confirms decryption & data integrity

Even with all these different measures in place, it is still possible to jam Z-Wave. But it’s not cheap nor is it easy. But let’s give it a try for fun!

Jamming Z-Wave

Jamming Z-Wave starts with a Silicon Labs Z-Wave Developers Kit and Simplicity Studio. However, these kits are not cheap costing at least $150 for just one. It may be possible to find a cheap 900MHz transmitter but you will need two of them and they must have the ability to tune them to the specific Z-Wave frequencies of 908.4MHz and 916MHz in the US. These are not going to be $3 battery powered transmitters and they require a significant amount of technical knowledge. Neither cheap nor easy so I think we’re pretty safe from your typical burglar.

Z-Wave uses two channels (frequencies) in the US: 908.4MH for 9.6 and 40Kbps and 916MHz for 100Kbps. Z-Wave Long Range (ZWLR) also has two channels but uses spread-spectrum encoding which spreads the signal out across a band of frequencies centered at 912MHz and 920MHz. By using two channels Z-Wave is frequency agile which makes it harder to jam since you need two transmitters instead of just one. The spectrum analyzer plot below shows four DevKits blasting all 4 channels at once.

Z-Wave jamming all four frequencies – 912 & 920 are Z-Wave Long Range

Creating the jammer firmware utilizes the RailTest utility in Simplicity Studio V5. Select the DevKit in the Debug Adapters window, click on the Example Projects & Demos tab then check the Proprietary button. The only example project should be the “Flex (RAIL) – RAILtest application”. Click on Create and use the defaults. The default frequency will state it is 868 but ignore that as the Z-Wave modes are all built into RailTest and do not need to be configured. Once the project is created, click on Build and then download to a devkit. Right click on the devkit in the Debug Adapters window and click on Launch Console. Click on the Serial 1 tab then click in the command box at the bottom and press ENTER. You should get a RailTest prompt of >.

Once you're at the RailTest prompt, enter the following commands:

rx 0                 -- disables the radio which must be done before changing the configuration
setzwavemode 1 3     -- Puts the radio into Z-Wave mode
setpower 24 raw      -- 24=0dbm radio transmit power - valid range is 1 to 155 but is non-linear
setchannel 0         -- ch0=916 ch1=908.4 ch2=908.42 - ZWLR ch0=912 ch1=920
setzwaveregion 1     -- EU=0, 1=US, 13=US Long Range
Do one of the following 2 commands:
SetTxTone 1          -- narrow band Carrier Wave - unmodulated
SetTxStream 1        -- Pseudo-Random data - modulated and in ZWLR uses Spread Spectrum (DSSS) 
Use the same command with a 0 to turn the radio off
Remember to "rx 0" before changing any other configuration values

RAILtest is a powerful utility and can do all sorts of things beyond just Z-Wave. The radio in the Silicon Labs chips are Software Defined Radios, they can be customized to many common frequency bands. It is easy to create customized versions of RAILtest that will transmit a carrier wave (CW) or a modulated signal at just about any frequency band, not just Z-Wave. But that’s more complex than I have time to discuss here.

Now that we know how to jam, how do we detect it and inform the user that jamming is taking place? Detecting jamming takes place at both ends of the Z-Wave network, the Controller and the End Device. Let’s first look into the End Device which in a security system is typically a motion sensor or a door/window sensor.

End Device Jamming Detection

Most end devices are battery powered so they spend most of their time sleeping and are completely unaware of any RF jamming that might be taking place. Only when motion is detected or a door is opened will the sensor wake up and find the radio waves being jammed. The best way to check for RF jamming is to first try to send a message. When the message fails to be acknowledged, then start looking to see if jamming is occurring.

The Z-Wave Application Framework (ZAF) handles sending the message and eventually calls a callback to report status. The callback comes through EventHandlerZwCommandStatus() which will be called several seconds after sending the message. The protocol tries various mesh routes, power levels and baud rates which takes time so be sure to stay awake long enough to receive the callback. The callback returns the TxStatus variable which is typically TRANSMIT_COMPLETE_OK (0x00) which means the message was delivered. But if jamming is taking place and the radio was unable to go through it, you’ll get a TRANSMIT_COMPLETE_FAIL (0x02). This status is different than the TRANSMIT_COMPLETE_NO_ACK (0x01) which means the message was not acknowledged which is usually because the destination is offline but could also be due to jamming.

The next step is to verify that jamming is taking place by getting the current Received Signal Strength Indicator (RSSI) level by queuing the EZWAVECOMMANDTYPE_GET_BACKGROUND_RSSI event . The RSSI is a simple value in dB of the strength of signal at the radio receiver when its not actively receiving a frame. In normal operation, this value should be around -100dB. Every environment is different so the threshold for the radio being jammed needs to be a value that is significantly higher than the average value. This is particularly tough in dense housing like apartments where perhaps every unit has a Z-Wave network. This results in a relatively high RSSI average. The key here is you can’t use a simple hard-coded threshold for jamming detection based on RSSI. Instead you must average the RSSI values across a long time-span (typically hours).

Z-Wave Notification of Jamming

The next step after detecting jamming has occurred is to notify the hub. But if the jamming is still in progress, how can the notification get thru? Naturally you can’t get thru while the jamming is still happening. The trick is to keep trying and hope that the jamming is short term. The problem is that a battery powered sensor can’t keep trying constantly as it will run out of battery power perhaps in just a few minutes. You must manage battery power and at the same time keep trying with a longer and longer timeout between attempts. At some point the jamming should end, perhaps hours after the initial break-in but the jammer will eventually run out of battery power.

The Z-Wave Notification Command Class has a pre-defined value for RF Jamming – Notification Type of Home Security (0x07) with an Event of RF Jamming (0x0C) and the current average RSSI level. This notification is a critical notification so it should be wrapped in Supervision Command Class to guarantee it has been delivered and understood by the controller.

Sample Code

The code below first checks the TxStatus, if is not OK, then the RSSI level is checked by queuing the GET_BACKGROUND_RSSI event. Once the RSSI is sampled, the function will be called again with the switch going thru the GET_BACKGROUND_RSSI case below. This section of code then compares the current RSSI level with a background RSSI level and if the current level is above it then the SendRFJamNotificationPending global variable is set. When a frame is able to get thru then the pending RF Jam notification is sent since it appears the jamming has ended. This ensures the Hub is informed that there was jamming so the Hub can then decide if it needs to inform the user. The basics of the algorithm are coded here:

... 
static void EventHandlerZwCommandStatus(void)
...
switch (Status.eStatusType)    
...
    case EZWAVECOMMANDSTATUS_TX:  // callback from attempted message delivery
...
            
        if (pTxStatus->TxStatus != TRANSMIT_COMPLETE_OK) { // failed to deliver - check RSSI
            EZwaveCommandType event = EZWAVECOMMANDTYPE_GET_BACKGROUND_RSSI;
            QueueNotifyingSendToBack(g_pAppHandles->pZwCommandQueue, &event, 0); // Queue GET_RSSI
        } else { // message delivered OK
            // more cleanup happens here...
            if (SendRfJamNotificationPending) { // Is there a pending Jam Notification?
               SendRfJamNotificationPending=false;   // Send it!
               void * pData = PrepareNotifyJamReport(&zaf_tse_local_actuation);
               ZAF_TSE_Trigger((void *)CC_NotifyJam_report_stx, pData, true);
            }
        }
...
    case EZWAVECOMMANDSTATUS_GET_BACKGROUND_RSSI:  // only called if failed to deliver a message
        if (Status.Content.GetBackgroundRssiStatus.rssi > BackgroundRSSIThreshold) {    
            // Set a global to send an RF Jamming Notification which will be sent when jamming ends
            SendRfJamNotificationPending=true;
            SendRfJamNotifRSSI= Status.Content.GetBackgroundRssiStatus.rssi;
        }
... // Not shown are application level retries and various other checking

Now that we have jamming detection enabled on the end-device side, let’s look at the controller end of the communication.

Controller Jamming Detection

Obviously the main thing the controller needs to do is react to a jamming notification from an End Device. The ultimate action the controller performs is left to the controller developer but clearly the end user should be notified that jamming has been detected. But that notification needs to be qualified with enough information about the average RSSI noise level to avoid false jamming detection notifications.

If the jammer is way out at 200+ meters, the RSSI level may not jump up significantly as measured by the controller. Thus, it is important to react to the End Device notification of jamming. However, the controller must poll the RSSI level at regular intervals to determine if jamming is taking place nearby. The question is how often should it poll and when to react to a sudden change in the RSSI level? There is no definite answer to this question other than “it depends” and it depends on a lot of different factors. Typically, the RSSI should be sampled a few times per minute – perhaps every 30 seconds. If a value seems unusually high, perhaps sample several more times at a much faster rate to confirm that the RSSI has jumped and its not glitch. Like the End Device case, the average RSSI value needs to be calculated across a fairly long time frame (minutes to perhaps an hour) and when there is a change from the average value then the user should be notified.

ZW_GetBackgroundRSSI

The SerialAPI function ZW_GetBackgroundRSSI() (0x3B) will return three or four bytes of RSSI values for the various channels supported by the controller. This function can be sent to the Z-Wave controller frequently as it does not cause any delays in the radio. It does use UART bandwidth so it can’t be called too frequently or it may interfere with normal Z-Wave traffic. The polling function should coded with a low priority so it is only sent when the UART has been idle for a few seconds to avoid collisions with Z-Wave radio traffic. The one-byte RSSI values are coded as shown in the table below.

RSSI values returned by the ZW_GetBackgroundRSSI():

HexDecimal (2s Comp)Description
0x80-0xFF-128 – -1Measured RSSI in dBm
0x00-0x7C0 – 124Measured RSSI in dBm
0x7D125RSSI is below sensitivity and cannot be measured
0x7E126Radio saturated and could not be measured as it is too high
0x7F127RSSI is not available

Typically a 700 series Z-Wave controller will measure about -100dBm when the airwaves are fairly quiet. During a transmission the RSSI is often about -30dBm when the node is within a few meters of the controller.

TxStatusReport

The TxStatusReport is returned after a frame was transmitted which includes several fields with a variety of RSSI measurements. There is a Noise Floor of the sender as well as a NoiseFloor of the receiver. The RSSI values can be monitored during normal Z-Wave traffic without polling. It is best to use these values while Z-Wave traffic is taking place and to temporarily pause the polling while the Z-Wave UART is busy. Once the UART is idle, resume RSSI polling.

Missing Heartbeats

Another aspect of jamming is that battery powered devices typically send a “heartbeat” message every hour so the controller knows for sure the device is online and working (mostly that the battery isn’t dead). The controller should be keeping track of how long it has been since the last time a battery powered node has checked in and if it has missed two or at most three heartbeats, the controller should inform the user (or the installer) that the device is offline and unable to communicate. If the battery was already low, then the battery is probably dead. If the battery was fine, then there is a possibility that the device is being jammed.

Z-Wave Multi-sensor Version 2.0 with SmartStart – Batteries not Required

Merrimack, NH March 19, 2018 – Express Controls LLC announces the release of Version 2.0 of the EZMultiPli three-in-one multi-sensor and Z-Wave repeater. The Z-Wave Plus certified device is one of the first available SmartStart devices on the market and is available for purchase now on Amazon.

EZMFrontAnimFeatures

  • Motion Sensor
  • Temperature Sensor
  • Light Sensor
  • Color Indicator Night Light
  • Z-Wave® Range extender
  • Wall Powered – No Batteries, No wires
  • Screw tab for secure installation
  • SmartStart enabled

The new features for the 2.0 version are the addition of a screw tab for secure mounting and SmartStart. The tab on the enclosure enables secure mounting in either a standard outlet or a decorator outlet common with GFCI circuits used in kitchens and baths. The tab ensures children, elders, cleaners or maintenance personnel can’t easily remove the sensor. Secure mounting means the Z-Wave network is robust and reliable since EZMultiPli typically is a key repeater in the Z-Wave mesh network. Never worry about the batteries dying since EZMultiPli is wall powered. Installed by anyone with just a screwdriver – no wires, no batteries, no damage to the walls drilling holes.

SmartStart

qrPackSigma Designs SmartStart technology makes installation easy and secure. If your home automation system supports SmartStart, the first step is to scan the QR code on the back of EZMultiPli. If EZMultiPli was purchased as part of a kit containing several SmartStart devices, the QR code may have already been scanned at the factory. The next step is to simply plug EZMultiPli into a wall outlet and it will automatically join the Z-Wave network. Inclusion should begin within a couple of minutes but may take longer if several SmartStart devices are added at the same time. SmartStart uses the latest Security S2 encryption technology for all radio communication ensuring your system is secure.

Express Controls

Express Controls provides expert consulting services for the design and manufacture of wireless Internet of Things (IoT) products for Z-Wave product development teams. Express Controls has been been developing IoT products using Z-Wave protocol since 2003 and the 100 series Z-Wave RF transceivers.  Currently we are developing Z-Wave products using the latest Sigma Designs fifth generation 500 series RF modules which enable us to quickly prototype any IoT device you can imagine.  We have resources available for PCB design and layout as well as industrial design and 3D printing to help visualize the entire IoT product quickly.   Leverage our knowledge of the nuances of the Z-Wave protocol to bring your Z-Wave product to market quickly.  

Contact

Eric Ryherd – CEO and Z-Wave Expert Consultant

info@expresscontrols.com – +1 (603) 889-4841 – ExpressControls.com

EZMultipli How-To for Vera

vera_logo_tmVera is one of the more popular home automation platforms and with the UI7 release it fully supports the EZMultipli muli-sensor. The main selling points of Vera are “no monthly subscription fee, no contracts and no hassles” which pretty much sums Vera up. Vera is an easy to use system with good support and an active user community who are often quicker to respond to questions than the Vera technical support team.  Vera has several platforms to choose from. I’m using the VeraEdge in this How-To which for only $69 is a good deal. This post will show you how to get the most out of Express Controls EZMultipli Z-Wave MultiSensor and specifically how to use it with Vera UI7. Refer to the EZMultipli User Manual for more details.

EZMultipli Multisensor

ezmultipli200The EZMultipli performs five functions:

  1. Motion Sensor
  2. Temperature Sensor
  3. Light Level Sensor
  4. Color LED indicator
  5. Z-Wave Range Extender

What sets the EZMultipli apart from the typical battery-powered motion sensors is that it is wall powered so you never need to change the batteries! Because EZMultipli is wall powered it is a Z-Wave range extender and adds another routing node in the Z-Wave mesh network. If your Z-Wave network is a little flakey and you have some nodes that are having trouble reporting in reliably, adding an EZMultipli or two will provide additional routes for every Z-Wave node to talk to every other node. The sensors are just a bonus!

Because EZMultipli is simply plugged into an outlet, there is no mounting required. No screws, no tape, no mending of the wall when you move. This makes EZMultipli ideal for apartments, offices or other short-term uses where you’ll want to take it with you when you leave. But what if you don’t have an outlet in the right spot for detecting motion? Ah… that is a problem and not every device can solve every problem. EZMultipli was specifically designed with a wide-angle lens to capture motion in any direction out to about 12 feet. So it doesn’t have to be placed in the perfect location to be able to detect motion where you need it. It is ideal for kitchens, bathrooms and garages which often have unused outlets in handy locations. You can also put it in unused outlets under a table or chair. Obviously it isn’t much good behind a couch or other solid furniture. Some locations like hallways will have to use a battery-powered motion sensor because the sensor has to be in just the right place and there are no outlets in that place.

Another placement problem involves pets. If you put the sensor down low in a typical wall outlet, virtually any pet from a cat to a small dog will trigger the motion sensor. You have to either put the sensor up on a higher outlet or in a room that pets are not allowed in when you need to detect if a burglar is in your home. In my case we always close off our home office from the pets during the day when we are not home. Only the EZMultipli in the office and the one in the garage will send us a text when the home is in Away mode.

Setup and Configuration

The first and most important step is to make sure you are running Vera Firmware Version 1.7.2406 or later. Check the firmware via Settings->Firmware and the screen will show you which version you currently have and if there is an upgrade available. You can include the EZMultipli into Vera but previous firmware versions didn’t understand the Z-Wave Notification command class used by EZMultipli so it isn’t very usable without at least this version.

Include EZMultipli into Vera in the normal way: Devices->Add Device->Generic Z-Wave Device->Next->Next then press the button on the side of EZMultipli. You should get a device called “EZM” which is the default name. Pick a room. Then click on FINISH.

You’ll then have three new devices:

  1. vera3sensors
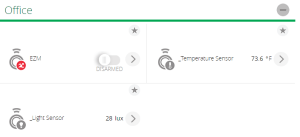
EZM which is the motion sensor
  2. _Temperature Sensor which is obviously the temperature sensor
  3. _Light Sensor which is the light level in the room

Initially the temperature and light level sensors don’t have a value but in a few minutes the sensors will send readings the values will update. Rename the devices to more meaningful names  by clicking on the > and entering a new name. These three sensors are the main sensors – but where is the color LED? Currently you have to load a Plug-in to use the color LED. Hopefully in a future release Vera will add support for the Z-Wave Color Command Class and we won’t need the plugin anymore. To add the plugin click on Apps->Install Apps and then enter “EZM” into the search bar and the EZMultipli Color Utility will come up. Click on DETAILS and then install the app. While you’re at it, search for DataMine2 graphing plug in and install that too.

vera4sensorsWith the plugin installed there are three more devices but the only one that is interesting is the EZM Light 2 which has the 8 LED color buttons as shown here. Assign that device to the same room as the other EZMultipli sensors. I create a virtual room called ZZZVirtual to put all the extra stuff I don’t normally want to see so it’s at the bottom of the screen.

If you wave your hand in front of the motion sensor, the EZM device will go red indicating the sensor has detected motion. If there is no motion for 10 minutes it will go back to being grey which means no-motion. NOTE! The motion sensor sends a MOTION command when motion is initially detected. Then, only after the OnTime number of minutes of there being a complete lack of motion will the No-MOTION command be sent. The sensor does NOT send a motion command every time it detects motion (though you can enable it to do that).

Vera Scenes

The most common thing you want to do with a motion sensor is to turn on a light when motion is detected and turn it back off again when no one is in the room. With Vera, we do this with Scenes. Click on Scenes->Add Scene. This will open up a wizard that will guide you thru the process. Step 1 picks the device which in this case is EZM and we’ll choose “Whenever EZM detects motion whether is armed or disarmed”. Step 2 is to pick a light to control. In this case we’ll chose the EZM Color and chose the green color. Click on Next step, scroll down and name the scene then click Finish. Next click on the RUN button just to be sure the scene works. There are tons of other options you can choose as part of the scene so try them out and experiment. You can set the scene to only run at certain times of the day or certain days of the week. This is handy for example to set the brightness of a dimmer to be only 20% late at night when all you really want is a night lite to get down a hallway without stepping on the toys your kids left in the hallway.

Configuration Parameters

EZMultipli has five configuration parameters that change how the device responds to various events.

  1. OnTime – Number of minutes the light will stay on when motion is not detected
  2. OnLevel – Dim level sent to Association Group 2 nodes
  3. LiteMin – Number of minutes between luminance reports
  4. TempMin – Number of minutes between temperature reports
  5. TempAdj – Temperature adjustment

The most important parameter is the OnTime parameter. As the name implies, OnTime is the number of minutes the lights will be ON after motion stops being detected. When you walk within range of the motion sensor, Vera receives a Motion event immediately. Vera can then turn lights on or if you configure association group 2 EZMultipli can control the lights directly. Let’s say you then walk around the room for 5 minutes and then walk out of the room. Then 10 minutes later, Vera will be sent a No-Motion event. Why 10 minutes and not 5? Because OnTime is set to 10 minutes which starts counting down when you left the room, not when you entered. Here are some recommended values for the OnTime parameter:

  • OnTime=0 disables sending OFF commands. Only ON commands are sent. This setting is not recommended.
  • OnTime=1 is the minimum setting. For example, late at night you could set the timeout to be only the 1 minute since you’re probably just passing thru. But at dinner time you want a much longer timeout of 30 minutes to prevent Vera from turning the lights off at the dinner table while you are eating dinner. Having to wave your arms in the air in the middle of dinner to turn the lights back on will lower your Wife-Acceptance-Factor (WAF).
  • OnTime=5 minutes is generally a good setting for hallways or other places that you are actively moving thru and only need the lights on while moving thru the space
  • OnTime=10 default setting which is OK for most use cases.
  • OnTime=30 minutes is recommended for rooms where people might be sitting for some time such as in an office or watching TV.
  • OnTime=60 minutes or more might be necessary for a room where someone might be sitting for a long time perhaps reading.

Remember that EZMultipli detects MOTION, not people. So the people have to be moving within range of the sensor otherwise the lights will turn off while they are still in the room!

veraconfigTo change parameters, click on the > on the EZM device and then the Device Options to get the screen shown here. If there are no configuration settings shown, click on the Add Configuration Settings button and one will be created. Select “1 byte dec” in the Data Size field then enter the desired value for the OnTime parameter in the Desired Value field. Then click on Save Changes.

Refer to the EZMultipli User Manual for details on the other parameters. The challenge with the Vera parameter user interface is that it only uses unsigned integers whereas many parameters are signed values. For example, parameter 5 is the TempAdj parameter which is in 1/10ths of a degree Fahrenheit and is a signed number. So if you want to adjust the temperature readings of EZMultipli up by 1.2 degrees you enter 12. But if you want to lower the readings by 1.2 degrees you have to enter the number of 256-12=244. The other parameters are unsigned 1 byte integers so they don’t require this crazy math.

Z-Wave Association Direct Control of Lights

EZMultipli also supports the Z-Wave Association Command class. Associations are used to tell EZMultipli to send ON/OFF commands directly to other Z-Wave devices with out requiring a scene or even talking to Vera. The advantage of Associations is that it results in very fast response times and even if Vera isn’t running the lights will come on and off automatically. Note that if EZMultipli controls a device via Associations, the Vera UI won’t show the new state of the controlled device until it gets around to polling it which can be several minutes later.

Setting associations in Vera involves first clicking on the EZM device and then Device Options. Associations are just below the configuration parameters. Enter a 2 in the Group ID field and then Click on Add Group. Refresh the screen and there should now be Group ID 2. Click on SET and choose the device you want to directly control using EZMultipli. Finally click on Apply Changes. Once this is set, the device that is now associated will automatically turn on when motion is detected and turn off after OnTime minutes when motion is no longer detected.


Well that should get you started using EZMultipli with Vera. Future posts will include more advanced usage of the color LED and how to use the other sensors. If you have an interesting use case for the EZmultipli please add a comment or send an email to DrZwave at ExpressControls.com.

Seven Habits of Highly Effective Z-Wave Networks for Consumers

You have a Smart Home using Z-Wave as a wireless technology for all these Internet of Things (IoT) devices to communicate with each other. But maybe things are not working quite as well as you expect. You press a button on your phone and 1… 2… 3… and then finally a light comes on or maybe it doesn’t come on at all! Another common problem is when a battery powered sensor was updating the temperature last week and this week it just doesn’t seem to be sending updates anymore or at best sporadically. As a Z-Wave expert I’ve built and rebuilt hundreds of Z-Wave networks and have come up with a few habits to make Z-Wave networks more reliable.

1. Minimize Polling

This is probably THE number one mistake new users of Z-Wave make. They figure Z-Wave is a high speed network so they can just poll a light switch every 3 seconds and then react to any change in the switch. Z-Wave and most other wireless networks work best when the network is highly available. If the network is busy, every device that needs to send a message has to wait its turn and then compete (and often collide) with all that polling traffic. Collisions slow everything down just like rubber-necking on the highway.

Polling used to be the only way to get around a patent that fortunately expired in February 2016. The patent forced many light switch manufacturers to not send a message when you flipped the switch. Several manufacturers found ways to get around this or they licensed the patent. But now that the patent has expired, you can get light switches that do send a report immediately when their state has changed.

So the primary way to minimize polling is to replace the few devices in your Smart Home that trigger an event  (or SmartApp or Magic or whatever your hub calls it) with one that will instantly send an update. If you have some older switches but they’re not that important to instantly know their state has changed, you can still poll them but no more than once every few minutes. Remember that if you have 60 Z-Wave devices and you poll each one once/min then you are polling once/second and the network is hammered! So only poll a couple of nodes!

2. Have enough devices to create a mesh

I can’t tell you how many people I’ve worked with that had a door lock and a hub and nothing else, maybe a battery powered thermostat. And they wondered why the connection to the lock was unreliable when the hub was at the far end of the building! Z-Wave relies on Always-On (110VAC powered) nodes to build a “mesh” network. The mesh is the key to Z-Wave reliability. Every Always-On node acts as a repeater in the mesh and is able to forward a message from one node to another in the mesh. But only the Always-On nodes can forward a message. Battery powered devices like door locks and battery powered thermostats cannot forward messages. Only the Always-On nodes can.

Solution: If some devices are not reliable, add more Always-On devices. Add a Z-Wave repeater or any device like a lamp dimmer. Even if you don’t use the lamp dimmer it will act as a repeater and improve the network. I have a few lamp switches I use for my Christmas lights which I leave plugged in year round because they help the Z-Wave network since these nodes are at the periphery of my home.

Distance between nodes is not always the criteria for adding more nodes in a network. The Z-Wave radio signals may bounce off metal objects like mirrors or appliances and cause two nodes that are only a few feet apart be completely unable to talk to each other due to reflections of the radio signals. Adding more nodes in the mesh provide alternate routes to nodes that otherwise might be in a dead zone due to these reflections cancelling out the radio signals.

3. Place the hub in a central location

Putting the hub in a corner of the basement might be convenient, but its a terrible idea for Z-Wave. The hub is the most important node in the network and should have the best location possible. While Z-Wave is a mesh network and can route or hop thru other nodes in the mesh, each hop is a significant delay and chokes up the network with more traffic. Ideally the hub should reach 90% of the nodes in your Smart Home without relying on routing. If the hub has Wifi then putting it in a central location is easy, you just need a wall outlet to plug it in. I have my hub hung off the back of a TV cabinet in roughly the middle of the first floor of my home.

4. Heal the Network

Once a Z-Wave network is built, it has to be “healed” so every node can use all the other nodes in the network to route messages. This healing process can take many minutes to even hours depending on the size of the network. When you first build a Z-Wave network, the first node added only knows that the hub is in the network. When you add a second node, the hub knows that both the nodes are in the network but the first node you added has no idea that node 2 is there – unless you heal the network. So any time you add a node, you need to heal at least a few nodes in the network if not the entire network. Be cautious with the healing process – it uses 100% of the Z-Wave bandwidth during the process and every node will wake up every FliR node (door locks) at least once which will drain the batteries of the FLiR node. Generally only heal when nodes have been added or removed or if there seems to be a problem in the network.

Z-Wave is able to self-heal automatically. Z-Wave nodes will try various routes to get their message thru if at first it doesn’t succeed.  The node will remember the Last Working Route and try that one first for the next message. But if the nodes have no idea there are other nodes in the network they have no way of knowing what routes to try so at least one full heal of the network is required.

HomeSeer

homeseerhealHomeSeer has several platforms so the precise method might be slightly different than shown here. From the web interface home page select the menu Plug-Ins->Z-Wave->Controller Management then select the Action “Fully Optimize a Network”. The network wide heal will take some time depending on the size of the network.

SmartThings

SmartThings Expert Z-Wave Eric Ryherd DrZwaveSmartThings  user interface is thru their app which makes finding the network heal a bit of a challenge. Start from the dashboard and click on the three lines in the upper left corner. Your Hub should be the first choice in the menu that slides out, click on your hub. A new menu comes up, click on the last choice “Z-Wave Utilities”. The last choice on the next menu that slides in is “Repair Z-Wave Network” so click on it and then click on “Start Z-Wave Network Repair”. The repair will take from minutes to over an hour depending on the size of your network.

Vera

veraheal
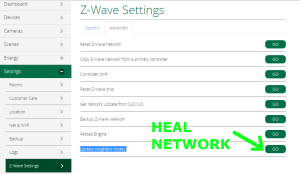
Vera has several versions of their UI but each of them has a similar menu structure so these instructions should work on any version. The Vera version shown here is UI7. Use a PC to log into GetVera.com and select your hub. From the Dashboard, select Settings->Z-Wave Settings and then click on the advanced tab. At the bottom of the advanced tab is the GO button to run the “Update Node Neighbors”. Depending on the size of the Z-Wave network this process will take several minutes to over an hour.

5. If a device doesn’t pair, first exclude it, then include it

You’ve taken the brand new Z-Wave IoT widget out of the box and you’ve tried to pair it (the Z-Wave term is “inclusion”) but it just won’t include! Arrrghhh! The first thing to try is to exclude the node first and then try including it. Any hub can “reset” or exclude a Z-Wave device even if that device was previously connected to another network. Some manufacturers occasionally fail to exclude the device during testing so the device may already be connected to their test network. Z-Wave Expert IoT WirelessOr you may have inadvertently included the device but the inclusion process failed somehow and the hub is confused. Excluding the node should reset it to the factory fresh state. Newer Z-Wave Plus devices (which have this logo on them) are required to have a way to reset them to factory defaults using just the device itself. Every device is different so you’ll have to refer to the device manual to perform a factory reset but if all else fails this should make the device ready to pair. Naturally having the hub physically close to the device being paired will also help though most devices can be paired from a distance.

Secure devices like door locks are particularly challenging to pair. First the secure device has to join the Z-Wave network, then the AES-128 encryption keys have to be exchanged and if that process fails (which it does on occasion), then you have to exclude and try the inclusion process all over again. Secure devices definitely want to be within a few feet of the hub during inclusion to ensure reliable and speedy Z-Wave communication.

6. Battery life and how to maximize it

When a battery powered Z-Wave device wakes up and turns on its radio, it uses 10,000 times more battery power than when it’s asleep. So the entire trick to making batteries last is to minimize the amount of time the device is awake. Some devices naturally have other battery draining activities mostly involving motors to throw a deadbolt or raise a window shade. Obviously any motor will use a lot more battery power than the Z-Wave radio but the radio will play a significant role in battery life.

When a battery powered device is added to a Z-Wave network the hub should do two things:

  1. Assign the Association Group 1 NodeID to the hub
    1. Association Group 1 is the “LifeLine” in Z-Wave and devices use this lifeline to send all sensor data and alerts to this node
    2. All hubs are required to assign Group 1 but double check this assignment
  2. Set the Wake Up Interval to no more than once per hour and ideally only a few times per day
    1. Every hub assigns the WakeUpInterval differently and largely handles it behind the scenes so this may be difficult to verify or change
    2. If the device is waking up every few minutes and sends a sensor reading then its battery life isn’t going to be more than a few weeks
    3. The battery level of the device is usually reported at the WakeUpInterval  rate

Many sensors have other Association Groups or Configuration Parameters that will let you specify the frequency of sensor readings. Realize that the more often the sensors report in, the shorter the battery life.

7.  Dead nodes in your controller

One of the big problems in Z-Wave network maintenance is eliminating “dead” nodes. When a device fails or for whatever reason is no longer in use, then it needs to be removed from the controller. If it remains in the controller then the controller will try to route thru this dead node on occasion resulting in delays in delivering messages. Eventually the self-healing aspects of Z-Wave will make this less likely but various devices will on occasion attempt to route thru it. Since the node is dead, that wastes valuable Z-Wave bandwidth and potentially battery power of sleeping devices. Occasionally running a Heal on the network will remove the node from the routing tables but it will remain in the controllers routing tables. It is best to completely remove this dead node. Each hub has a different method for removing dead nodes and usually requires going into an advanced Z-Wave menu.

Following these guidelines will help your Z-Wave experience be more robust. If you have more questions please feel feel to reach out via email to drzwave at expresscontrols.com.