Silicon Labs Simplicity Studio v5 (SSv5) has a steep learning curve but once you’re up the curve it can accelerate an IoT firmware development. However, sharing the project among several engineers isn’t as straightforward as it should be. Fortunately it is actually quite easy once you know the trick which I explain below.
Step 1 – Create the Repo
Create the repository using Github or your own private server. Typically this is done via a browser which also sets various options up such as the language and the license. Once this has been created, copy the name of the repository to use in the next step.
Step 2 – Clone the Repo locally
Clone the repo onto your computer using the typical “git clone HTTPS://github.com/<gitusername>/<projectName.git>“. Choose a folder on your computer that is convenient. I recommend the folder be under the SSv5 workspace folder which will make finding it later a little easier.
Step 3 – add a .gitignore file
Create a file at the top level of the repo to ignore the files you do not need to put under source code control. Use the lines below and include any other files or folders as needed. You may want to include the .hex, .gbl, .map, and .axf files which are under the GNU* folder or copy them to another folder so you have the binary files in case building the project proves to be difficult. Note that I am NOT checking in the SDK which is huge and Silabs keeps even quite old versions on github and via their website. Thus you don’t need to keep a copy of the SDK on your local servers – but you can if your are that kind of person.
################ Silabs files to ignore #####################
# Ignore the Build Directory entirely
GNU*
# Other SSv5 files to ignore
.trash
.uceditor
.projectlinkstore
*.bak
Step 4 – Create the SSv5 Project
Create the SSv5 project within this folder. Typically this is done using the Project Wizard or selecting one of the sample applications. Be sure to locate the project within the repo folder.
Step 5 – Commit the Files
Commit the files to the repo using:
git add *
git commit -am "Initial checking"
git push
At this point you can either clone the repo into a different folder to see if it works or have a team member clone it onto their computer. Try building the project to see if there are any missing files.
Step 6 – Import the Newly Cloned Repo into SSv5
This is the tricky bit! We’re going to Import the project into SSv5 but the TRICK is to import it into the cloned repo folder. By default, SSv5 will make a COPY of the project when importing. The problem with that is that you then lose the connection to the git repo which is the whole point!
Use “File – Import” then browse to the cloned git repo folder. The project name should show up with a Simplicity Studio .sls file. Select this file by clicking on it then click Next.
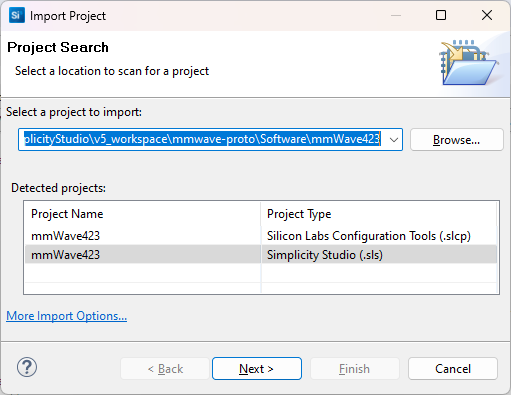
Then the next screen pops up. Ensure the proper compiler is selected for the project! GCC10 or GCC12! These settings should come from the .sls so you shouldn’t need to change them.

Click on Next
THIS IS THE MOST IMPORTANT STEP! In the next screen, UNCHECK the “Use Default Location” button! Click on Browse and select the repo folder.

Click on Finish. Then check that the project builds properly.
Team members can now work collaboratively on the project and manage the check in/out and merging using standard git commands.
When the project is complete, be sure everything is checked in and the repo is clean, then in SSv5 right click on the project and select delete. But do not check the “delete project contents on disk” checkbox unless you want to also delete the local repo. This removes the project from the workspace in SSv5 but leaves the files where they are. You can clean up the files later.
The key to using git with SSv5 is to UNCHECK the Default Location button during the import. If you leave that checked, or browse to the wrong folder, SSv5 will make a COPY of all the files and you lose the connection to the git repo.
