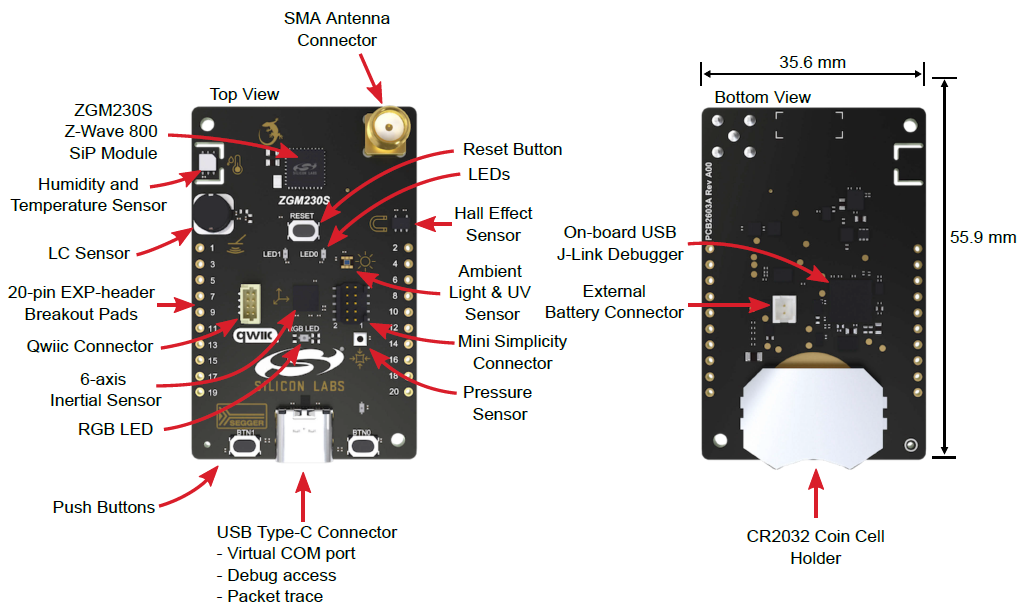
Have you always wanted your very own Z-Wave widget-thing-a-ma-bob-doohickey? Silicon Labs recently released the Thunderboard Z-Wave (TBZ) which is an ideal platform for building your own Z-Wave device. Officially known as the ZGM230-DK2603A, the TBZ has sensors galore, expansion headers to connect even more stuff, comes with a built-in debugger via USB-C and can be powered with a single coin cell. Totally cool! I am working on a github repo for the TBZ but right now there are three simple sample apps in Simplicity Studio to get started.
ThunderBoard Z-Wave

Features
- ZGM230 Z-Wave Long Range Module – +14dBm radio – 1mi LOS RF range
- ARM Cortex-M33, 512/64K FLASH/RAM, UARTs, I2C, SPI, Timers, DAC/ADC and more
- Built-in Segger J-Link debugger
- USB-C connectivity for SerialAPI and/or debugging
- RGB LED, 2 yellow LEDs, 2 pushbuttons
- Temperature/Humidity sensor
- Hall Effect sensor
- Ambient Light sensor
- 6-Axis Inertial sensor
- Metal sensor
- 1Mbyte SPI FLASH
- Qwiic I2C connector
- Break-out holes
- SMA connector for antenna
- Coin cell, USB or external power
- Firmware development support via Simplicity Studio
Sample Applications
There are three sample applications in Simplicity Studio at the time of this writing (Aug 2022 – SDK 7.18.1);
- SerialAPI,
- SwitchOnOff
- SensorMultilevel
The TBZ ships with the SerialAPI pre-programmed into it so you can use it as a Z-Wave controller right out of the box. Connect the TBZ to a Raspberry Pi or other computer to build a Z-Wave network. Use the Unify SDK to get a host controller up and running quickly or use the PC-Controller tool within Simplicity Studio for development and testing. The SwitchOnOff sample app as the name implies simply turns an LED on/off on the board via Z-Wave. This is the best application to get started as the ZGM230 chip is always awake and is easy to debug and try out. The SensorMultilevel sounds like a great app as it returns a temperature and humidity but at the moment it does not use the sensor on the TBZ and simply always returns a fixed value. SensorMultilevel shows how to develop a coin-cell powered device. Additional sample apps are expected to be available in future SDK releases but I am working on a github repo with a lot of sensor support.
Naturally a single Z-Wave Node doesn’t do much without a network. You’ll need some sort of a hub to connect to. Most of the common hubs (SmartThings, Hubitat, Home Assistant, etc) will at least let you join your widget to the network and do some basic control or status reporting. You need either a pair of TBZs or perhaps purchase the even cheaper UZB7 for the controller side and then the TBZ for the end-device. Then you have a network and can build your doohickey and talk to it over the Z-Wave radio.
Getting Started
Plug in the TBZ to your computer and open Simplicity Studio which will give you a list of applicable documents including the TBZ User Guide. Writing code for the TBZ definitely requires strong C programming skills. This is not a kit for an average Z-Wave user without strong programming skills. There is a steep learning curve to learn how to use the Z-Wave Application Firmware (ZAF) so only experienced programmers should take this on. I would recommend watching the Unboxing the 800 series video on the silabs web site to get started using Simplicity Studio. I hope to make a new video on the TBZ and publish the github repo so stay tuned.
Have you created a Thing-a-ma-bob using the TBZ? Let me know in the comments below!
Thanks for the writeup! Did you ever publish the repository with samples for the ZGM230S board?
I come from the software world and are using Z-wave products already. I’ve wanted to create some prototype projects using the standard for several years but I’ve been turned off by the steep price and complexity to get started on the dev boards (as in needing own programming cables, debugging tools etc. that’s often included in i.e ESP32 and Arduino). But seems like the ZGM230s board changes that by having USB C with virtual com port, debugging and tracing. It will make it a lot easier to get started tinkering with this thing if you already have a background in programming.
It’s a big step in the right direction that I think will get more software oriented developers into z-wave.
Can’t wait to try it out 😉
LikeLike
I have the Silicon Labs ZGM230S board and would like to modify the “Z-Wave – SoC Multilevel Sensor” sample to use a Command Class Configuration parameter instead of a hard code value for the sensor report interval. The sample code just used a #define constant for the interval. The sample code actually defines two configuration parameters in “MultilevelSensor.cc_config”, but I’m clueless when it comes to the usage of these two configuration parameters in the sample. To me it looks like those are defined, but not used. Do you know where to find more information about using configuration parameters in the code of an end device?
LikeLike
Well, adding a Config CC parameter isn’t easy. And it will depend a lot on which version of the SDK you are using.
Best help I can offer is to follow the example in the other sample apps and maybe look thru the documentation.
The sample apps have changed significantly in the 7.20 release and I have not been thru them to know how this is being done now.
LikeLike
The challenge is that it looks like there is almost zero useful documentation on the ZAF framework.
LikeLike
Unfortunately I have to agree with you. Documentation has been a problem for a long time and continues to be that way. Plus the ZAF does so many things in very strange ways I find it nearly impossible to follow the code.
LikeLike