![]() Vera is one of the more popular home automation platforms and with the UI7 release it fully supports the EZMultipli muli-sensor. The main selling points of Vera are “no monthly subscription fee, no contracts and no hassles” which pretty much sums Vera up. Vera is an easy to use system with good support and an active user community who are often quicker to respond to questions than the Vera technical support team. Vera has several platforms to choose from. I’m using the VeraEdge in this How-To which for only $69 is a good deal. This post will show you how to get the most out of Express Controls EZMultipli Z-Wave MultiSensor and specifically how to use it with Vera UI7. Refer to the EZMultipli User Manual for more details.
Vera is one of the more popular home automation platforms and with the UI7 release it fully supports the EZMultipli muli-sensor. The main selling points of Vera are “no monthly subscription fee, no contracts and no hassles” which pretty much sums Vera up. Vera is an easy to use system with good support and an active user community who are often quicker to respond to questions than the Vera technical support team. Vera has several platforms to choose from. I’m using the VeraEdge in this How-To which for only $69 is a good deal. This post will show you how to get the most out of Express Controls EZMultipli Z-Wave MultiSensor and specifically how to use it with Vera UI7. Refer to the EZMultipli User Manual for more details.
EZMultipli Multisensor
 The EZMultipli performs five functions:
- Motion Sensor
- Temperature Sensor
- Light Level Sensor
- Color LED indicator
- Z-Wave Range Extender
What sets the EZMultipli apart from the typical battery-powered motion sensors is that it is wall powered so you never need to change the batteries! Because EZMultipli is wall powered it is a Z-Wave range extender and adds another routing node in the Z-Wave mesh network. If your Z-Wave network is a little flakey and you have some nodes that are having trouble reporting in reliably, adding an EZMultipli or two will provide additional routes for every Z-Wave node to talk to every other node. The sensors are just a bonus!
Because EZMultipli is simply plugged into an outlet, there is no mounting required. No screws, no tape, no mending of the wall when you move. This makes EZMultipli ideal for apartments, offices or other short-term uses where you’ll want to take it with you when you leave. But what if you don’t have an outlet in the right spot for detecting motion? Ah… that is a problem and not every device can solve every problem. EZMultipli was specifically designed with a wide-angle lens to capture motion in any direction out to about 12 feet. So it doesn’t have to be placed in the perfect location to be able to detect motion where you need it. It is ideal for kitchens, bathrooms and garages which often have unused outlets in handy locations. You can also put it in unused outlets under a table or chair. Obviously it isn’t much good behind a couch or other solid furniture. Some locations like hallways will have to use a battery-powered motion sensor because the sensor has to be in just the right place and there are no outlets in that place.
Another placement problem involves pets. If you put the sensor down low in a typical wall outlet, virtually any pet from a cat to a small dog will trigger the motion sensor. You have to either put the sensor up on a higher outlet or in a room that pets are not allowed in when you need to detect if a burglar is in your home. In my case we always close off our home office from the pets during the day when we are not home. Only the EZMultipli in the office and the one in the garage will send us a text when the home is in Away mode.
Setup and Configuration
The first and most important step is to make sure you are running Vera Firmware Version 1.7.2406 or later. Check the firmware via Settings->Firmware and the screen will show you which version you currently have and if there is an upgrade available. You can include the EZMultipli into Vera but previous firmware versions didn’t understand the Z-Wave Notification command class used by EZMultipli so it isn’t very usable without at least this version.
Include EZMultipli into Vera in the normal way: Devices->Add Device->Generic Z-Wave Device->Next->Next then press the button on the side of EZMultipli. You should get a device called “EZM” which is the default name. Pick a room. Then click on FINISH.
You’ll then have three new devices:
 EZM which is the motion sensor
- _Temperature Sensor which is obviously the temperature sensor
- _Light Sensor which is the light level in the room
Initially the temperature and light level sensors don’t have a value but in a few minutes the sensors will send readings the values will update. Rename the devices to more meaningful names by clicking on the > and entering a new name. These three sensors are the main sensors – but where is the color LED? Currently you have to load a Plug-in to use the color LED. Hopefully in a future release Vera will add support for the Z-Wave Color Command Class and we won’t need the plugin anymore. To add the plugin click on Apps->Install Apps and then enter “EZM” into the search bar and the EZMultipli Color Utility will come up. Click on DETAILS and then install the app. While you’re at it, search for DataMine2 graphing plug in and install that too.
 With the plugin installed there are three more devices but the only one that is interesting is the EZM Light 2 which has the 8 LED color buttons as shown here. Assign that device to the same room as the other EZMultipli sensors. I create a virtual room called ZZZVirtual to put all the extra stuff I don’t normally want to see so it’s at the bottom of the screen.
If you wave your hand in front of the motion sensor, the EZM device will go red indicating the sensor has detected motion. If there is no motion for 10 minutes it will go back to being grey which means no-motion. NOTE! The motion sensor sends a MOTION command when motion is initially detected. Then, only after the OnTime number of minutes of there being a complete lack of motion will the No-MOTION command be sent. The sensor does NOT send a motion command every time it detects motion (though you can enable it to do that).
Vera Scenes
The most common thing you want to do with a motion sensor is to turn on a light when motion is detected and turn it back off again when no one is in the room. With Vera, we do this with Scenes. Click on Scenes->Add Scene. This will open up a wizard that will guide you thru the process. Step 1 picks the device which in this case is EZM and we’ll choose “Whenever EZM detects motion whether is armed or disarmed”. Step 2 is to pick a light to control. In this case we’ll chose the EZM Color and chose the green color. Click on Next step, scroll down and name the scene then click Finish. Next click on the RUN button just to be sure the scene works. There are tons of other options you can choose as part of the scene so try them out and experiment. You can set the scene to only run at certain times of the day or certain days of the week. This is handy for example to set the brightness of a dimmer to be only 20% late at night when all you really want is a night lite to get down a hallway without stepping on the toys your kids left in the hallway.
Configuration Parameters
EZMultipli has five configuration parameters that change how the device responds to various events.
- OnTime – Number of minutes the light will stay on when motion is not detected
- OnLevel – Dim level sent to Association Group 2 nodes
- LiteMin – Number of minutes between luminance reports
- TempMin – Number of minutes between temperature reports
- TempAdj – Temperature adjustment
The most important parameter is the OnTime parameter. As the name implies, OnTime is the number of minutes the lights will be ON after motion stops being detected. When you walk within range of the motion sensor, Vera receives a Motion event immediately. Vera can then turn lights on or if you configure association group 2 EZMultipli can control the lights directly. Let’s say you then walk around the room for 5 minutes and then walk out of the room. Then 10 minutes later, Vera will be sent a No-Motion event. Why 10 minutes and not 5? Because OnTime is set to 10 minutes which starts counting down when you left the room, not when you entered. Here are some recommended values for the OnTime parameter:
- OnTime=0 disables sending OFF commands. Only ON commands are sent. This setting is not recommended.
- OnTime=1 is the minimum setting. For example, late at night you could set the timeout to be only the 1 minute since you’re probably just passing thru. But at dinner time you want a much longer timeout of 30 minutes to prevent Vera from turning the lights off at the dinner table while you are eating dinner. Having to wave your arms in the air in the middle of dinner to turn the lights back on will lower your Wife-Acceptance-Factor (WAF).
- OnTime=5 minutes is generally a good setting for hallways or other places that you are actively moving thru and only need the lights on while moving thru the space
- OnTime=10 default setting which is OK for most use cases.
- OnTime=30 minutes is recommended for rooms where people might be sitting for some time such as in an office or watching TV.
- OnTime=60 minutes or more might be necessary for a room where someone might be sitting for a long time perhaps reading.
Remember that EZMultipli detects MOTION, not people. So the people have to be moving within range of the sensor otherwise the lights will turn off while they are still in the room!
 To change parameters, click on the > on the EZM device and then the Device Options to get the screen shown here. If there are no configuration settings shown, click on the Add Configuration Settings button and one will be created. Select “1 byte dec” in the Data Size field then enter the desired value for the OnTime parameter in the Desired Value field. Then click on Save Changes.
Refer to the EZMultipli User Manual for details on the other parameters. The challenge with the Vera parameter user interface is that it only uses unsigned integers whereas many parameters are signed values. For example, parameter 5 is the TempAdj parameter which is in 1/10ths of a degree Fahrenheit and is a signed number. So if you want to adjust the temperature readings of EZMultipli up by 1.2 degrees you enter 12. But if you want to lower the readings by 1.2 degrees you have to enter the number of 256-12=244. The other parameters are unsigned 1 byte integers so they don’t require this crazy math.
Z-Wave Association Direct Control of Lights
EZMultipli also supports the Z-Wave Association Command class. Associations are used to tell EZMultipli to send ON/OFF commands directly to other Z-Wave devices with out requiring a scene or even talking to Vera. The advantage of Associations is that it results in very fast response times and even if Vera isn’t running the lights will come on and off automatically. Note that if EZMultipli controls a device via Associations, the Vera UI won’t show the new state of the controlled device until it gets around to polling it which can be several minutes later.
Setting associations in Vera involves first clicking on the EZM device and then Device Options. Associations are just below the configuration parameters. Enter a 2 in the Group ID field and then Click on Add Group. Refresh the screen and there should now be Group ID 2. Click on SET and choose the device you want to directly control using EZMultipli. Finally click on Apply Changes. Once this is set, the device that is now associated will automatically turn on when motion is detected and turn off after OnTime minutes when motion is no longer detected.
Well that should get you started using EZMultipli with Vera. Future posts will include more advanced usage of the color LED and how to use the other sensors. If you have an interesting use case for the EZmultipli please add a comment or send an email to DrZwave at ExpressControls.com.
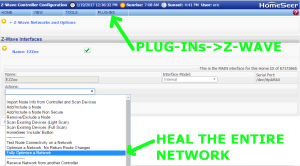 HomeSeer has several platforms so the precise method might be slightly different than shown here. From the web interface home page select the menu Plug-Ins->Z-Wave->Controller Management then select the Action “Fully Optimize a Network”. The network wide heal will take some time depending on the size of the network.
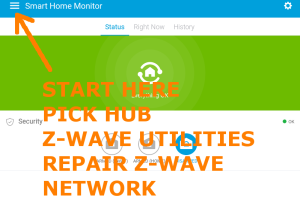 SmartThings user interface is thru their app which makes finding the network heal a bit of a challenge. Start from the dashboard and click on the three lines in the upper left corner. Your Hub should be the first choice in the menu that slides out, click on your hub. A new menu comes up, click on the last choice “Z-Wave Utilities”. The last choice on the next menu that slides in is “Repair Z-Wave Network” so click on it and then click on “Start Z-Wave Network Repair”. The repair will take from minutes to over an hour depending on the size of your network.
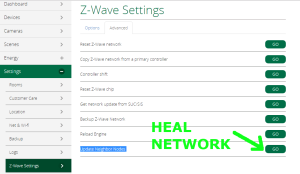 Vera has several versions of their UI but each of them has a similar menu structure so these instructions should work on any version. The Vera version shown here is UI7. Use a PC to log into GetVera.com and select your hub. From the Dashboard, select Settings->Z-Wave Settings and then click on the advanced tab. At the bottom of the advanced tab is the GO button to run the “Update Node Neighbors”. Depending on the size of the Z-Wave network this process will take several minutes to over an hour.