SmartThings, now part of electronics giant Samsung, is a popular home automation platform and with the recently published Device Type fully supports the EZMultipli multi-sensor. ![]() SmartThings (a.k.a. ST) relies on the Cloud for processing which makes it flexible but is a little slower executing commands compared to a system with local processing. The ST user interface is exclusively thru a smartphone or tablet, there is no web interface for desktop computer access. The system is easy to use with good support and an active user community. SmartThings requires a $99 hub to interface to Wifi, Zigbee and Z-Wave devices. This post will show you how to get the most out of Express Controls EZMultipli Z-Wave MultiSensor. Refer to the EZMultipli User Manual for more details.
SmartThings (a.k.a. ST) relies on the Cloud for processing which makes it flexible but is a little slower executing commands compared to a system with local processing. The ST user interface is exclusively thru a smartphone or tablet, there is no web interface for desktop computer access. The system is easy to use with good support and an active user community. SmartThings requires a $99 hub to interface to Wifi, Zigbee and Z-Wave devices. This post will show you how to get the most out of Express Controls EZMultipli Z-Wave MultiSensor. Refer to the EZMultipli User Manual for more details.
EZMultipli Multisensor
 The EZMultipli performs five functions:
- Motion Sensor
- Temperature Sensor
- Light Level Sensor
- Color LED indicator
- Z-Wave Range Extender
What sets the EZMultipli apart from the typical battery-powered motion sensors is that it is wall powered so you never need to change the batteries! Because EZMultipli is wall powered it functions as a Z-Wave range extender which adds another routing node in the Z-Wave mesh network. If your Z-Wave network is a little flakey and you have some nodes that are having trouble communicating reliably, adding an EZMultipli or two will provide additional routes for every Z-Wave node to talk to every other node. Then the sensors are a bonus!
Because EZMultipli is firmly plugged into an outlet, there is no mounting required. No screws, no tape, no mending of the wall when you move. This makes EZMultipli ideal for apartments, offices or other short-term uses where you’ll want to take it with you when you leave. But what if you don’t have an outlet in the right spot for detecting motion? Ah… that is a problem and not every device can solve every problem. EZMultipli was specifically designed with a wide-angle lens to capture motion in any direction out to about 12 feet. So it doesn’t have to be placed in the perfect location to be able to detect motion where you need it. It is ideal for kitchens, bathrooms and garages which often have unused outlets in handy locations. You can also put it in unused outlets under a table or chair. Obviously it isn’t much good behind a couch or other solid furniture. Some locations like hallways will have to use a battery-powered motion sensor because the sensor has to be in just the right place and there are no outlets nearby.
 Another placement problem involves pets. If you put the sensor down low in a typical wall outlet, virtually any pet from a cat to a small dog will trigger the motion sensor. You have to either put the sensor up on a higher outlet or in a room that pets are not allowed in when you need to detect if a burglar is in your home. In my case we always close off our home office from the pets during the day when we are not home. Only the EZMultipli in the office and the one in the garage will send us a text when the home is in Away mode.
Setup and Configuration
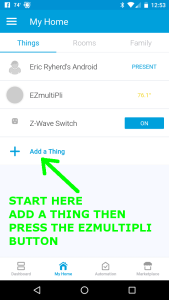
 Include EZMultipli into the ST hub in the normal way: Just click on the +Add A Thing button on the ST app. Next then press the button on the side of EZMultipli. You should get a device called “EZMultipli” which is the default name.
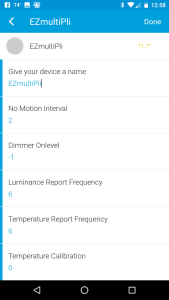
Rename the device if you want then click on Save and then OK.
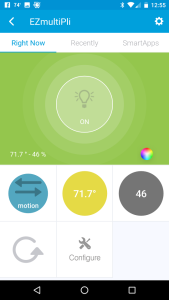
You should now have the screen shown here. The main Tile at the top will turn the LED behind the lens on and off or if you click on the color circle you can change it to be any of 8 different colors. The motion sensor, temperature sensor and luminance sensor are on the next row of tiles. The REFRESH button will force the ST hub to poll EZMultipli to be certain it has the latest sensor readings. We’ll get to the CONFIGURE tile in the next section.
 At this point, the best thing to do is to click on the Gear icon in the upper right corner. This brings you to the configuration screen where you can adjust various parameters to suite your needs. Generally the defaults will work fine for most applications. The next section will get into more details.
The temperature and luminance sensors are set to send a report every 6 minutes which is fine for an average sized Z-Wave network. However, if you have a lot of nodes (more than 50) in your network and specifically more than a few EZMultiplis, it would be better to reduce the frequency of sensor updates just to keep the traffic from getting clogged up. If you set the report frequency to 0 then that sensor will never send an update so if you’re not interested in a sensor then make its value 0. Click on DONE and then CONFIGURE to push the configurations down to the EZMultipli.
Initially the temperature and light level sensors may not have a value but in a few minutes the sensors will send readings the values will update.
For the first several minutes after joining the sensor to the ST hub the LED will blink white anytime is detects motion. You can use this to make sure it will detect motion where you want it too. If it is not detecting motion, try flipping it around in the outlet as this will change the orientation of the lens elements. Remember that EZMultipli detects MOTION, not people. So the people have to be moving within range of the sensor otherwise the lights will turn off while they are still in the room!
Configuration Parameters
 EZMultipli has five configuration parameters that change how the device responds to various events.
- OnTime – Number of minutes the light will stay on when motion is not detected
- OnLevel – Dim level sent to Association Group 2 nodes
- LiteMin – Number of minutes between luminance reports
- TempMin – Number of minutes between temperature reports
- TempAdj – Temperature adjustment and 1/10ths of a degree F
Generally ST works best with a fairly short OnTime parameter of 2 minutes. This allows a SmartApp to control the amount of time a light stays on after motion is no longer detected. The current Device Type doesn’t provide access to the Z-Wave Association command class so that feature of the EZMultipli is not available. Thus, it is best to leave the OnTime at 2 minutes and configure your SmartApps to do all the other work. Refer to the EZMultipli User Manual for details on the other parameters.
After changing any configuration settings, be sure to click on the CONFIGURE button to push the configuration settings to EZMultipli.
SmartApps
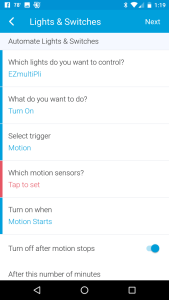 Now that you have a motion sensor, the most common thing is to turn a light on or off when there is motion or not. In ST that is done using a SmartApp. Go back to the home screen and click on Automation at the bottom. Then click on + Add a SmartApp and select Lights and Switches and then Smart Lights. You can then easily pick the light(s) you want to control and which sensor will trigger which lights as shown here. Turn on the Turn Off After Motion Stops and then pick a reasonable amount of time for the lights to turn off then no-motion is detected. In a hallway, this number can be quite short like 2 or 3 minutes. In a kitchen it needs to be more like 15 minutes and if sitting in a living room reading you might want it to be more than an hour. You can also set different timeouts using multiple SmartApps that are only active at certain times of the day. For example, I significantly extend the OFF time during meal times because while sitting at our kitchen table I don’t want the lights to turn off while we’re eating but no one has moved enough for the kitchen sensor to detect motion (which is next to the sink, not the table).
Color LED
The color LED of the EZMultipli is easily controlled using the phone app. But the more interesting use is to display things like when your garage doors are open or what the weather will be today (Blue for nice blue sky, Yellow for sunny and warm, Red for blistering HOT, White for snow, Green for rain, etc.). I’ll follow up later with more posts on how to do fun things like this with SmartThings and EZMultipli.
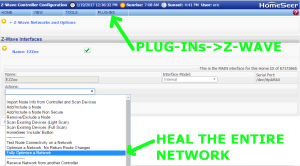 HomeSeer has several platforms so the precise method might be slightly different than shown here. From the web interface home page select the menu Plug-Ins->Z-Wave->Controller Management then select the Action “Fully Optimize a Network”. The network wide heal will take some time depending on the size of the network.
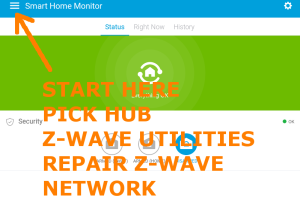 SmartThings user interface is thru their app which makes finding the network heal a bit of a challenge. Start from the dashboard and click on the three lines in the upper left corner. Your Hub should be the first choice in the menu that slides out, click on your hub. A new menu comes up, click on the last choice “Z-Wave Utilities”. The last choice on the next menu that slides in is “Repair Z-Wave Network” so click on it and then click on “Start Z-Wave Network Repair”. The repair will take from minutes to over an hour depending on the size of your network.
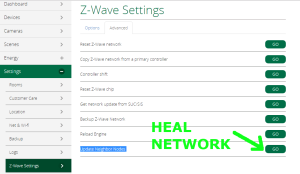 Vera has several versions of their UI but each of them has a similar menu structure so these instructions should work on any version. The Vera version shown here is UI7. Use a PC to log into GetVera.com and select your hub. From the Dashboard, select Settings->Z-Wave Settings and then click on the advanced tab. At the bottom of the advanced tab is the GO button to run the “Update Node Neighbors”. Depending on the size of the Z-Wave network this process will take several minutes to over an hour.